25 July 2010

Calculating Longitude

Last time, we decided that at 16:58:38 GMT, it was 'Solar Noon' at my location. That was the moment the Sun reached it's peak in the sky. More importantly, it was the moment that the Sun crossed my meridian -- the line of Longitude that I was standing on at that moment.

In other words, at 16:58:38 GMT, the Sun and I were on the same Longitude. So if we can find the longitude of the Sun at that moment, we will know my longitude. It's that easy.

How do we find the Sun's longitude at that exact moment? From the Nautical Almanac, of course.


Daily Page, Nautical Almanac

The Sun's longitude at any particular time (GMT, of course), is called its Greenwich Hour Angle, in celestial navigation lingo. More commonly abbreviated as GHA.

The Daily Page of the Nautical Almanac lists the Sun's GHA for every hour of the day. It's under the 'Sun' column on the left side, labeled 'GHA'.

We will use the information on the Daily page to find the GHA of the Sun at  the nearest hour: 16:00:00 GMT. If you inspect the table, you will see that, at that time, the Sun's GHA was 58° 35.2'.

Next we need to look up how far the Sun traveled in the next 58 minutes and 38 seconds. Again, the Nautical Almanac provides the answer.


Increments and Corrections Pages 
Nautical Almanac


In the Nautical Almanac, the "Increments and Corrections" pages list how far the Sun (and Moon and planets and stars) move through the sky from 0 seconds, up to 1 hour. Since we want to know how far the Sun moved in 58 minutes and 38 seconds, we turn to the 58 Minute page (click on the above image for a closer look).

The seconds are listed down the left side. The Sun's incremental GHA is in the first column on the left.

If you follow the seconds down to 38, you will find the incremental GHA for 58:38. It's 14° 39.5'.

If we add the hourly GHA and the minutes/seconds GHA, we'll find the Sun's exact longitude at 16:58:38:

58° 35.2'
14° 39.5'
---------
72° 74.7'
or
73° 14.7'

And since that, dear reader, was the Sun's longitude at solar noon, it was also my longitude. At least according to my sights and calculations.

So, putting the latitude and longitude together, my fix was:

N40° 40.1'    W73° 14.7'
or
N40° 40' 6"   W73° 14' 42"

Using Google Maps, we can map this location to see how we did.

The Great South Bay and Fire Island, off of Long Island, NY

On the map are two blue markers. The top one is at N40° 40' 6" W73° 14' 42". It's in the middle of the Great South Bay, just east of the Robert Moses Causeway, that goes out to Fire Island. 

My actual location was on the beach at Fire Island, just opposite the light house, at N40° 37' 48" W73° 13' 03".

Those two points are 2.8 nm apart. Disappointed? Don't be! Although you will read that it's possible to get sextant fixes within .2 nm, I've never seen this in actual practice. If I can get within 5nm, I feel I'm doing pretty good. In a small boat, with a healthy chop or swell, 20nm is more like it. 

And 5-20nm accuracy is good enough for actual use.

If you were crossing the Atlantic, say, and were taking daily noon Sun fixes, a 5nm accuracy would be more than you could use on a big Atlantic chart. And by the time you got within 20nm, you'd be on deck, scanning the horizon, waiting to say "Land Ho!" as loud as you could.

How could you improve these results?

You'd probably get more accurate sights with a good, metal sextant, like an Astra IIIb. A metal sextant will have a more stable Index Error, a better scope, and more precise vernier.

However, a sextant is only as good as the Navigator. It takes a lot of judgment and skill to line up the Sun with the horizon. Especially when the Navigator is being thrown around the companionway, and the horizon looks like the business side of a saw.

It also takes skill to plot the sights and draw a smooth, symmetrical noon curve -- particularly when the sights are not as neat and clean as you get from dry land.

This kind of skill only comes from months or years of daily practice. The kind of practice you'd get on an Atlantic crossing. If you're like me, you only dream of getting that kind of practice, but at least now you know what to do if you ever get the chance!

Bottom line, a sextant is not a GPS. That's why GPS -- let's not pretend here -- has rendered the sextant obsolete as a navigation instrument.

On the other hand, finding your location using a sextant is a heck of a lot more fun! And that's what this has all been about. A bit of summer fun, learning a new skill.

My goal has been to conduct you through this first fix with as little math and mumbo-jumbo as possible, to show you that Celestial Navigation is not rocket science or black magic. If I've done my job well, you should be saying to yourself, "Hey, that wasn't so hard, after all!"

I hope it's been as much fun for you as it's been for me.

I'll try to take another set of sights next week, so you can try to work one on your own. Until then, if you have any questions, please leave them in the comments section below, or email them to john@unlikelyboatbuilder.com.


Speaking of next time... if you'd like to be notified when I post a new 'lesson' (erratically, about 3 times a week), you can sign up for my super-sophisticated Automatic Notification Process. Actually, it's just an email, but Automatic Notification Process sounds better. I won't spam you, and you can de-sign up at any time.


If you enjoyed this episode of the Unlikely Boat Builder, please consider telling a friend about it, or posting a link on Facebook. Thanks!


Get Notified Automatically

I hope you're enjoying "The Unlikely Boat Builder" as much as I enjoy writing it. Over 250 people have asked for a way to be notified automatically when I post new episodes. I've figured out how to do this, so if you'd like to be notified, please click on the link below. I promise I'll never spam you (and Google will have my head if I do.)

Thanks for your interest!

-- John


Follow me on Twitter! My son Chris has been bugging me for a few weeks to use Twitter to make short, more frequent posts from my iPhone, for when I don't have the time for longer blog posts. I don't know how it will work out, but I'm willing to give it a try! My Twitter ID is UnlikelyVoyager (UnlikelyBoatBuilder is too long, apparently), and the URL is http://twitter.com/UnlikelyVoyager. Twitter me back, or leave a comment below, if you think this is worth while. Thanks, Chris!

24 July 2010

Time of Meridian Passage

If you've made it this far, congratulations! We're in the home stretch, and by the end of the next post, you'll have found my Longitude, and have completed your first noon sun sight. I'm excited, so let's get right to it.

In an earlier post, I said that if you could find the exact time of solar noon at your location, you could find your longitude.

So the first step is to pull out your Noon Curve and find the exact time that solar noon occurred at my location.

Noon Sun Curve - click for larger image
image jalmberg

You could just eye-ball it, but you can get greater accuracy by swinging a few lines with a pair of dividers. I've used this trick before when lofting Cabin Boy.


Finding the midpoint between two points, with a compass
drawing jalmberg

Suppose you want to find the midpoint between two points, A and B. Just take your dividers (I use my Weems & Plath navigation dividers), put the pointy end on point A and draw a curve above and below. Then do the same on point B. Then draw a line between the two intersecting curves. That's the trick.

We will use this trick to find the middle of our Noon Curve at 3 places, and then average the times to find the exact time of Solar Noon.

Finding the midpoint of the Noon Curve at 3 locations
click for larger image
drawing jalmberg

Again, this is something you want to actually do, not just read about, so pull out your Noon curve. Pick a spot near the top of the curve, like the point 'A' on my curve, above (click drawing for larger view.) The point should be both on the curve, and on one of the horizontal lines of the graph paper. Put the pointy end of your dividers on that point, and swing two curves, one above and one below.

Then find the point on the curve just opposite, by following the horizontal graph line over to the curve, and draw the two curves from that point.

Then line up a ruler with the two intersecting curves and draw the midpoint. I just draw a short segment between the two points, to keep the graph from getting too cluttered.

Then do the same with two other points in the middle and towards the bottom of the graph.

Once you've got your 3 midpoints, estimate the corresponding times as closely as possible. Your curve will be different than mine, so your times will be different. That's okay. Use the times you found.

My three times (all in GMT, of course) were:

A - 16:58:30
B - 16:58:40
C - 16:58:45

If you add them and then divide by 3, you get the mean time: 16:58:38. This was the exact time of solar noon at my location... at least according to my sights, my ability to draw a smooth curve, and my ability to estimate the three times from a small graph. This is not a GPS... human skill and error play a significant part in celestial navigation. Never forget!

Now that we have the exact time of solar noon (the 'exact time' you found from your graph will probably be different, but within 30 seconds, hopefully!), we can use that to find Longitude.

How we do that is pretty interesting, and that's what we'll tackle, next time!

>>> Next Episode: Calculating Longitude

Speaking of next time... if you'd like to be notified when I post a new 'lesson' (erratically, about 3 times a week), you can sign up for my super-sophisticated Automatic Notification Process. Actually, it's just an email, but Automatic Notification Process sounds better. I won't spam you, and you can de-sign up at any time.


If you enjoyed this episode of the Unlikely Boat Builder, please consider telling a friend about it, or posting a link on Facebook. Thanks!


Get Notified Automatically

I hope you're enjoying "The Unlikely Boat Builder" as much as I enjoy writing it. Over 250 people have asked for a way to be notified automatically when I post new episodes. I've figured out how to do this, so if you'd like to be notified, please click on the link below. I promise I'll never spam you (and Google will have my head if I do.)

Thanks for your interest!

-- John


Follow me on Twitter! My son Chris has been bugging me for a few weeks to use Twitter to make short, more frequent posts from my iPhone, for when I don't have the time for longer blog posts. I don't know how it will work out, but I'm willing to give it a try! My Twitter ID is UnlikelyVoyager (UnlikelyBoatBuilder is too long, apparently), and the URL is http://twitter.com/UnlikelyVoyager. Twitter me back, or leave a comment below, if you think this is worth while. Thanks, Chris!

23 July 2010

Calculating Latitude

Having taken our sights, graphed them to estimate Hs, and applied corrections to determine Ho, we are now ready to calculate the latitude of my position when I took the sights.

Since Ho is the observed height of the sun above the horizon, you might be wondering if Ho is the latitude value. No, it's not that simple, but almost.

Here is a diagram that explains the simple relationship between Ho and Latitude.

The geometrical relationship between Ho and Latitude
drawing jalmberg

Let's take this diagram step by step.

First, the inside circle represents the Earth. The outside circle represents the Celestial Sphere. Forget Copernicus and all that 'Earth rotating around the Sun' nonsense. Copernicus was clearly wrong. The Earth is at the center of the universe, and the Sun, Moon, stars, and planets all rotate around the earth, on the surface of the Celestial Sphere.

At the top of the Earth, you can see me with my sextant, taking my sights.

There are three lines drawn through the center of the earth, and projected out onto the celestial sphere:

  1. The Zenith line starts at the center of the earth, goes through me, and straight up to the Celestial Sphere. My Zenith is the point on the celestial sphere directly above my head
  2. The Horizon is at a right angle to the Zenith line
  3. The Equator is, well, the Equator
Study these three lines until they make sense to you, before continuing. They're pretty simple, but if you gloss over these three lines without really taking them in, the rest of this explanation will make no sense to you.

Got it? Okay, my Latitude is the angle between my Zenith line, and the equator. This is the angle we are trying to find.

Note that the angle of Latitude is equal to the sum two other angles, labled 'Dec.' and 'Z.D.'

Latitude = Dec + Z.D.

Z.D. is the Zenith Distance of the Sun -- the angle between the Sun and my Zenith. Since the Zenith and Horizon lines are at a right angle, it's pretty obvious that you can calculate the zenith distance by subtracting Ho from 90°.

Z.D. = 90° - Ho

Since we know that Ho is 71° 14.6', then Z.D. must be 18° 45.4'

Get it? Again, stop and study the diagram until this makes sense. If you just skip over this part, you won't really understand what's going on. It's easy, but you must stop a second to understand it.

Dec. is the Declination of the Sun -- the height of the Sun above the Equator at solar noon on 12 Jul 2010.

Note the difference between Ho and Declination: Ho is the height of the Sun above the horizon, and Dec is the height of the Sun above the equator.

How do we know what the Sun's declination was at noon on 12 Jul 2010? We look it up in the Nautical Almanac.


 Look up Sun's Declination in the Nautical Almanac
click for larger image


Actually, I circled the wrong entry. It's an easy mistake to make, so it's helpful that I made it (again!).

We don't want the declination of the Sun when it was solar noon in Greenwich (12:00 GMT), we want it when it was solar noon at my location, roughly 17:00 GMT.

You can see that the Sun's declination at 17:00 GMT on 12 July 2010 was 21° 54.7'. The 'N' indicates that the Sun was North of the Equator. (In January, for example, it would be South of the Equator.)

So, we are almost there.

We used Ho to find the Sun's Zenith Distance. We looked up the Sun's declination in the Nautical Almanac. If we just add those two angles together, we should get an angle that is equal to my Latitude:

ZD + Dec = Latitude

ZD:   18° 45.4'
Dec:  21° 54.7'
---------------
Lat:  40° 40.1'

So that's was my Latitude, according to my sextant sights. If  you've followed along, and studied the diagram above just a bit, it should make sense to you. And note that the only math we've done is some simple addition and subtraction. No rocket science, and hopefully, no mystery.

Questions?

Next time we tackle the slightly more difficult problem of Longitude.

>>> Next Episode: Time of Meridian Passage

Speaking of next time... if you'd like to be notified when I post a new 'lesson' (erratically, about 3 times a week), you can sign up for my super-sophisticated Automatic Notification Process. Actually, it's just an email, but Automatic Notification Process sounds better. I won't spam you, and you can de-sign up at any time.


If you enjoyed this episode of the Unlikely Boat Builder, please consider telling a friend about it, or posting a link on Facebook. Thanks!


Get Notified Automatically

I hope you're enjoying "The Unlikely Boat Builder" as much as I enjoy writing it. Over 250 people have asked for a way to be notified automatically when I post new episodes. I've figured out how to do this, so if you'd like to be notified, please click on the link below. I promise I'll never spam you (and Google will have my head if I do.)

Thanks for your interest!

-- John


Follow me on Twitter! My son Chris has been bugging me for a few weeks to use Twitter to make short, more frequent posts from my iPhone, for when I don't have the time for longer blog posts. I don't know how it will work out, but I'm willing to give it a try! My Twitter ID is UnlikelyVoyager (UnlikelyBoatBuilder is too long, apparently), and the URL is http://twitter.com/UnlikelyVoyager. Twitter me back, or leave a comment below, if you think this is worth while. Thanks, Chris!

20 July 2010

More Corrections

Last time, we calculated Apparent Altitude by correcting Hs for both Index Error and Dip Error. If you are like most people, you've already forgotten what these words mean, so it would be a good idea to go back and review what we did last time, before continuing on.

I'll wait...

Everything clear? Okay. There are 3 more errors we need to correct for. Again, I'll just touch them briefly, but they'll give you a good feeling for how a sextant works in the real world.

Refraction Correction:  Ever notice how a straw seems to bend when you immerse half of it in water?

Refraction of light as it transitions from air to water
photo wikimedia commons

The same thing happens when the light from the Sun enters the atmosphere from space. The light bends, or is refracted, causing the sun to look higher than it is. Therefore, we must correct this error by subtracting an equal amount. How much? I will discuss this in a moment.

Parallax Correction: All the tables in the Nautical Almanac are calculated from the center of celestial bodies. For example, from the center of the Earth to the center of the Sun. However, I took my measurements about 4,000 miles from the center of the Earth. This causes the sun to look lower than it is and we must correct this error by adding an equal amount. Again, I'll discuss how to find the correction in a moment.

Semidiameter Correction: Finally, when I measured the height of the sun over the horizon with my sextant, I aligned the horizon with the bottom of the sun, not with the center of the sun, because it's easier to see when the bottom of the sun is lined up. That means the center of the Sun was actually higher than I measured. Quite a bit higher, in fact... about 16'. So we definitly need to correct for that error.

Lucky for us celestial navigators, the Nautical Almanac takes care of all three errors with one look-up table.

Altitude Correction Table
Nautical Almanac

To find the correction, look at the left-hand column labeled 'Sun'. The Sun column is divide in two sub-columns, one for Oct-Mar, the other Apr-Sep. Our sights were taken in July, so we use the Apr-Sep side of the table.

The sub-columns are further divided into 'Lower Limb' and 'Upper Limb'. 'Limb' is CN-speak for half-circle. Since we measured to the bottom of the Sun, we will use the Lower Limb value.

We look for our Apparent Altitude of 70° 59.0' and don't find it. But way down at the bottom of the table, we find 67° 15' and 73° 14'. The correction for all altitudes between these two angles is +15.6'.

Again, +15.6' is the total of the three corrections described above. It is labled + so we know it must be added to the Apparent Altitude.

Apparent Altitude:70° 59.0'
Altitude Correction:+15.6'
Ho:71° 14.6'

What we end up with is called Ho, or the 'observed' height of the Sun above the horizon. This is the real deal. The actual height of the Sun over the ideal horizon, with all errors corrected for.

Except for human error, of course! That's not possible to calculate. We just have to hope it's small.

So, I promised back in the beginning that if we could find the exact height of the Sun above the horizon, we could use that to find our latitude. How do we do that?

Easy-peasy. And that will be our discussion next time!


Speaking of next time... if you'd like to be notified when I post a new 'lesson' (erratically, about 3 times a week), you can sign up for my super-sophisticated Automatic Notification Process. Actually, it's just an email, but Automatic Notification Process sounds better. I won't spam you, and you can de-sign up at any time.

>>> Next Episode: Finding Our Latitude (finally!)

If you enjoyed this episode of the Unlikely Boat Builder, please consider telling a friend about it, or posting a link on Facebook. Thanks!


Get Notified Automatically

I hope you're enjoying "The Unlikely Boat Builder" as much as I enjoy writing it. Over 250 people have asked for a way to be notified automatically when I post new episodes. I've figured out how to do this, so if you'd like to be notified, please click on the link below. I promise I'll never spam you (and Google will have my head if I do.)

Thanks for your interest!

-- John


Follow me on Twitter! My son Chris has been bugging me for a few weeks to use Twitter to make short, more frequent posts from my iPhone, for when I don't have the time for longer blog posts. I don't know how it will work out, but I'm willing to give it a try! My Twitter ID is UnlikelyVoyager (UnlikelyBoatBuilder is too long, apparently), and the URL is http://twitter.com/UnlikelyVoyager. Twitter me back, or leave a comment below, if you think this is worth while. Thanks, Chris!

18 July 2010

Latitude - Correcting the Sight

Hopefully, you've found some graph paper, plotted the sights provided last time, and drawn a smooth and symmetrical curve through the points.

If you did, you have drawn your first Noon Curve.


Noon Curve drawn freehand from sights
drawing jalmberg

What does this Noon Curve mean? It shows the path of Sun through the sky around Solar Noon on 12 July 2010. Before solar noon, the Sun climbed higher and higher into the sky; after solar noon, it began to sink again.

Solar noon occurred at the instant the Sun crossed my meridian. At that moment, the Sun reached it's highest point in the sky.

If you study the Noon Curve I've drawn, you will see that the top of the curve flattens out. The Sun seems to 'hang' in the sky at the top of the curve, for a minute or so. In fact, two of my sights had the same value: 71° 2.6'.

In fact, this flatness reveals a limitation of the sextant. The Sun actually continued to climb until exactly solar noon, but the changes in height were too small to be measured by an ordinary sextant.

The fact of this 'hanging Sun' has two consequences:

First, it's relatively easy to deduce the height of the Sun at solar noon. This makes it possible to determine your latitude with a fair degree of accuracy.

Second, it's more difficult to determine the exact moment of solar noon. When exactly did the Sun reach it's peak? It's impossible to tell just by looking at the top part of the curve. If we guess the wrong time, our position could be off by miles.

We'll tackle the easier part of the job -- latitude -- first, and leave the more difficult longitude till later (I eat the icing off the cake first, too!)

So, the first step is to look at our Noon Curve, and pick off what is called Hs, or Height of the celestial object as observed by the Sextant. (i.e., the 's' in Hs is for 'sextant', not for 'Sun'.)

Pretty obviously, Hs was 71° 2.6'.

You might wonder, at this point, why we drew the curve, at all? Hs was obvious from the raw data. Two reasons:

  1. we will need the curve for longitude
  2. sights are not normally so clean and smooth
The set of sights we are working with are nice and clean because I took them whilst standing on firm, unmoving ground. Sights taken from a moving boat are bouncier -- sometimes much bouncier -- making it impossible to just pick off Hs from the raw data.

But for our Hello World! problem, these sights are perfect, and let us see the flat, top part of the curve more clearly than sea-shot sights would have.

So, Hs is the height of the Sun above the horizon, as seen through a sextant. But this number is distorted by 5 errors that must be corrected for. Whole blog posts could be written about each error, but for our Hello World! problem we will just discuss them briefly.

Index Error: we already discussed this error, which is an error in the sextant, itself. I determined before taking my sights that the index error was 1.2' off the arc.

'Off the arc' means that the sextant's actual 0 point (the index) was 1.2' below the '0' marked on the arc. That is, the actual index was off the arc. Get it?

This means that all our measurements were 1.2' too high and we need to subtract 1.2' from Hs to correct for this error.

If the error was on the arc, then the sextant's actual 0 point would be above the '0' marked on the arc. I.e., the actual index was on the arc, and all our measurements were too low. Saying on or off the arc makes it easier to visualize the error, and thus the correction, making it less likely you will apply the wrong correction (which would double the error!) so take a bit of time to understand this wording.

Dip Error: as discussed previously, the only place you can get an accurate view of the horizon is with your eye at the suface of the water. I took my shots from 6' above the water, so the horizon I saw was below the horizon I would have seen, if I was in the water. This made Hs a bit higher than it should have been, so we must subtract a bit, to correct this error. But how much should we subtract? The Nautical Almanac has a handy DIP table that lets you look up this correction.

Correction table from Nautical Almanac
UK Hydrographic Office

If you look about half-way down the right hand colum, you will find the correction for 6 ft: -2.4'

So, as it says on the bottom of the correction page, Apparent altitude is the Sextant altitude (Hs) corrected for both index error and dip.

Hs:71° 2.6'
Index Error Correction:-1.2'
Dip Correction:-2.4'
Apparent Altitude:70° 59.0'

And 'Apparent Altitude' is what we need to find our next correction, but will have to wait until next time, because I am out of time (these posts take a crazy amount of time to write, believe it or not!)

So, how am I doing? Too fast? Too slow? We are starting to get into the math with this post, but I think I've kept it pretty simple and understandable. At least, I hope I have!

If you are still with me (and Google tells me that several hundred people are following this thread), please shoot me an email (john@unlikelyboatbuilder.com) and let me know how I'm doing. I'd love to have your feedback, and it would help make the rest of these Celestial navigation posts better. All feedback, good and bad, much appreciated.


Speaking of next time... if you'd like to be notified when I post a new 'lesson' (erratically, about 3 times a week), you can sign up for my super-sophisticated Automatic Notification Process. Actually, it's just an email, but Automatic Notification Process sounds better. I won't spam you, and you can de-sign up at any time.

>>> Next Episode: More Corrections

If you enjoyed this episode of the Unlikely Boat Builder, please consider telling a friend about it, or posting a link on Facebook. Thanks!


Get Notified Automatically

I hope you're enjoying "The Unlikely Boat Builder" as much as I enjoy writing it. Over 250 people have asked for a way to be notified automatically when I post new episodes. I've figured out how to do this, so if you'd like to be notified, please click on the link below. I promise I'll never spam you (and Google will have my head if I do.)

Thanks for your interest!

-- John


Follow me on Twitter! My son Chris has been bugging me for a few weeks to use Twitter to make short, more frequent posts from my iPhone, for when I don't have the time for longer blog posts. I don't know how it will work out, but I'm willing to give it a try! My Twitter ID is UnlikelyVoyager (UnlikelyBoatBuilder is too long, apparently), and the URL is http://twitter.com/UnlikelyVoyager. Twitter me back, or leave a comment below, if you think this is worth while. Thanks, Chris!

15 July 2010

Plotting the Sights

If you've stayed with me this far, you are probably ready for your first set of sights!

I said last time that all sights consist of two numbers:

  • The date and time of the sight
  • The height of the celestial object above the horizon, at that exact time
For a noon sun sight we want to start taking measurements about 1/2 hour before the estimated time of solar noon.

Therefore, on 12 July 2010, a half hour before estimated Solar Noon, I positioned myself on a beach with an unobstructed view of the southern horizon (my exact location is what you are going to try to discover!) I had my inexpensive Davis 15 sextant, and a chronometer -- set to GMT of course!

Before you take your sights, you want to measure and note down two small errors that you will have to correct for, later:

  • the height of your eye above the water
  • the index error of your sextant
Since I was fairly close to the edge of the water, the height of the sextant above the water was approximately 6 feet. Ideally, you want to your sextant to be 0 feet above the water, because that way you have the most accurate view of the true horizon. I.e., you should be in the water with your eye half-submerged.

That's a bit inconvenient, though, particularly while sailing in shark-infested waters, so it is acceptable to take your measurements above the water. That slightly alters your view of the horizon, creating what is called a dip error. I'll discuss next time how to correct for this error.

Then I looked at the horizon through the sextant. Actually, at the two horizons, since you always look at two things at the same time through a sextant. I adjusted the vernier knob on the sextant until the two horizon lines were lined up, and then read the 'distance' between them.

What the two horizons look like through the sextant... sort of

Of course, the measurement should read exactly 0°, since I was lining up something with itself. However, the reading is never exactly 0°. This hopefully tiny error is called the sextant's index error, and in my case, it was 1.2' off the arc

I'll discuss next time what this strange but helpful 'off the arc' or 'on the arc' terminology means, and how to correct for this error.

Those two errors carefully noted down, I was ready to take some sights. It was coming up on 16:30 GMT. I expected solar noon to occur some time around 17:00 GMT. My plan was to take sights every 5 minutes, until 16:55 GMT, where I would start taking sights every 1 minute. I would do this until around 17:05 GMT, when I would go back to taking sights every 5 minutes until 17:30.

The usual way to take sights is for one crew to handle the sextant, and another to handle the chronometer and notebook. This is the way Helena and I mange it, if there are two of us. We swap positions every day so we both get practice with the sextant.

It's more difficult for a single-hander to juggle both chronometer and sextant, but it can be done. I cheat a bit by using a really useful iPhone application called 'Time Signal'. This app announces the time audibly every 10 seconds. With headphones, I can hear the announcements, even when it's noisy. It makes it very easy to know the time, even when your eye is glued to the sextant.

Here's a video that shows how it works... 


'Time Signal' iphone app
Great app, the music is NOT include (thank goodness!)

This app allows me to keep my eye on the sextant, while my ears take care of the time. You will note that all my sights are taken at :00 seconds. This simplifies the plotting process and probably makes it a tad more accurate. It's difficult to do this with a hand-held watch, but Time Signal makes it a snap. If you have an iPhone, iPad, or iTouch (the ultimate on-board navigation tools, by the way!), you should check it out.

At any rate, with the sextant to my eye, and Time Signal in my ears, here are the sights I took:


TimeHs
16:30:0070° 4.2'
16:35:0070° 25.8'
16:40:0070° 37.2'
16:45:0070° 48.4'
16:50:0070° 57.2'
16:55:0071° 1.6'
16:56:0071° 1.8'
16:57:0071° 2.4'
16:58:0071° 2.6'
16:59:0071° 2.6'
17:00:0071° 2.0
17:01:0071° 1.6'
17:05:0070° 59.8'
17:10:0070° 51.6'
17:15:0070° 41.0'
17:20:0070° 28.2'
17:25:0070° 13.2'

So, those are the sights. Note that each sight is composed of both a time, and an angle. The angle is the height of the Sun above the horizon at that particular moment. Now, what do we do with them?

After carefully putting away your sextant down in the cabin, you pull out a piece of graph paper and your favorite pencil, and you graph all the points, as I have done below.

Note the example below does not use the same sights as above. That would be cheating! You will need to make your own graph. I used a pen for this example because the ink shows up better in a scan. I actually do all my graphs in pencil, for obvious reasons! Click the image for a larger view.


The sights, plotted on graph paper

What you do is plot the time on the X axis, against angle on the Y axis. You should end up with a graph that looks something like the example.

Once you have plotted all the points, you must draw a curve that fits the points as closely as possible.

Neatness and accuracy counts! The more accurate the curve, the more accurate your position will be.

As you draw your graph, you will discover that there is a bit of science and a bit of art to it. The sights you will be plotting are 'smoother' than normal, because I was standing on solid ground when taking them. Yet you will see that drawing the curve still requires a bit of judgement.

That's okay! Don't let that stop you. As Capt. Pete Culler famously said, experience starts when you begin. Just do the best you can.

Plastic French Curves, available at any office supply store

If you are a really crummy draftsman (like me) you can try using a set of French Curves. You can find them in the States at any office supply store for a few dollars. I imagine they are just as inexpensive, elsewhere.

I'm not sure they make the curves more accurate, but they look more accurate, and save a bit of time. Try them, if you like.

Free hand or not, have your curve drawn for next time. You're going to need it for the next step.


Speaking of next time... if you'd like to be notified when I post a new 'lesson' (erratically, about 3 times a week), you can sign up for my super-sophisticated Automatic Notification Process. Actually, it's just an email, but Automatic Notification Process sounds better. I won't spam you, and you can de-sign up at any time.

>>> Next Episode: Latitude - Correcting the Sight


If you enjoyed this episode of the Unlikely Boat Builder, please consider telling a friend about it, or posting a link on Facebook. Thanks!


Get Notified Automatically

I hope you're enjoying "The Unlikely Boat Builder" as much as I enjoy writing it. Over 250 people have asked for a way to be notified automatically when I post new episodes. I've figured out how to do this, so if you'd like to be notified, please click on the link below. I promise I'll never spam you (and Google will have my head if I do.)

Thanks for your interest!

-- John


Follow me on Twitter! My son Chris has been bugging me for a few weeks to use Twitter to make short, more frequent posts from my iPhone, for when I don't have the time for longer blog posts. I don't know how it will work out, but I'm willing to give it a try! My Twitter ID is UnlikelyVoyager (UnlikelyBoatBuilder is too long, apparently), and the URL is http://twitter.com/UnlikelyVoyager. Twitter me back, or leave a comment below, if you think this is worth while. Thanks, Chris!

13 July 2010

The Sights

So, now we know approximately when to take our sights. But what is a 'sight', exactly? When we take a 'sight', what do we end up with?

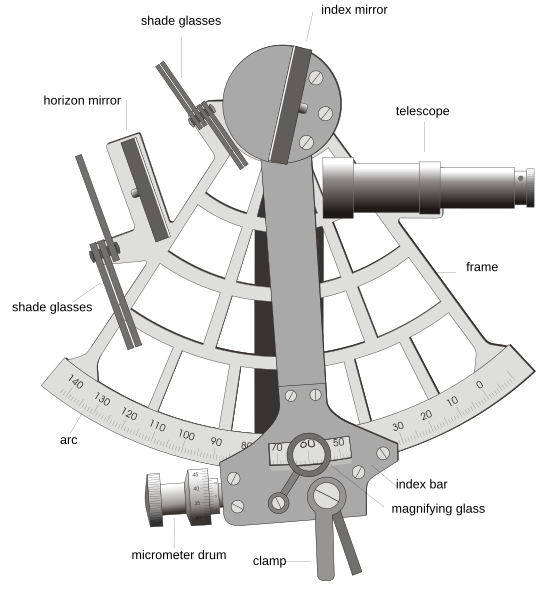
A sextant is a complicated-looking device designed to do something very simple: to measure the angle between two objects.

The Sextant
image wikimedia commons

It was invented during the great age of exploration and sail, and some of the great names of science worked on it's development, including Robert Hooke, Edmond Halley (of Halley's Comet), and Isaac Newton. I could write several blog posts on it's interesting history... but that would distract us from our Hello World! problem. And that is forbidden according to the rules!

Suffice to say that the sextant evolved out of a long line of navigation instruments. It's immediate ancestor, the octant, was one of the first reflecting instruments. Reflecting instruments are so called because they used mirrors to make it easier to take measurements than earlier instruments.

Briefly, the mirrors allow a user to view two objects at the same time. That was the key innovation. The movable arm, called the index arm or bar, enables the user to align the two objects in the viewer. When the two objects are aligned, the angle between them can be read directly off the instrument.

This ease of use -- view two objects, align them in the viewer, read the angle -- forced the sextant's many competitors into extinction in just a few years. And it's never been improved upon. It was that brilliant an invention.

Here's a short demo. Study how the mirrors work.

How reflecting instruments -- like sextants -- work
demo wikipedia commons

By 'taking a sight', we mean measuring (in degrees) the height of the object above the horizon, at a specific moment in time.

The exact time of the measurement is a critical part of the measurement, because the object (eg. the Sun) is moving and it's height is constantly changing.

The height of the Sun above the horizon, measured in degrees
image jalmberg

When we take a 'sight', therefore, we always end up with two numbers:

  • The height of the object above the horizon (Hs) in degrees
  • The date and time of the measurement

How accurate do these numbers have to be? Well, consider these facts:

  • the Sun moves over the ground at a speed of about 1000 miles per hour 
  • at the latitude of New York, the Sun moves westward about 0.1' per second 
  • the Sun's height changes (up or down) by about 0.1' every second
Not coincidentally, a high-quality sextant can measure to within 0.1' of arc. They could be manufactured to a higher degree of precision, but since celestial objects are moving roughly that far every second, added precision would not help, and might actually make it harder to use.

So, that gives you a feel for the kind of numbers we are working with: very small,  changing very rapidly.


The Sun
photo wikimedia commons

Finally, we have been talking about 'taking a sight', but most of the time, we will be taking several sights. A single sight is of limited usefulness.

In particular, since we don't know the exact time of solar noon (if we did, we'd know our exact longitude, which is one of the things we are trying to determine), we are going to take not one sight, but a series of sights, starting at about 1/2 hr before estimated solar noon, and ending at about 1/2 hr after.

But this series of sights and what to do with them is interesting enough to deserve it's own post, so I will leave that until next time.

So have your graph paper ready! We'll be doing some plotting!

Speaking of next time... if you'd like to be notified when I post a new 'lesson' (erratically, about 3 times a week), you can sign up for my super-sophisticated Automatic Notification Process. Actually, it's just an email, but Automatic Notification Process sounds better. I won't spam you, and you can de-sign up at any time.

>>> Next Episode: Plotting the Sights


If you enjoyed this episode of the Unlikely Boat Builder, please consider telling a friend about it, or posting a link on Facebook. Thanks!


Get Notified Automatically

I hope you're enjoying "The Unlikely Boat Builder" as much as I enjoy writing it. Over 250 people have asked for a way to be notified automatically when I post new episodes. I've figured out how to do this, so if you'd like to be notified, please click on the link below. I promise I'll never spam you (and Google will have my head if I do.)

Thanks for your interest!

-- John


Follow me on Twitter! My son Chris has been bugging me for a few weeks to use Twitter to make short, more frequent posts from my iPhone, for when I don't have the time for longer blog posts. I don't know how it will work out, but I'm willing to give it a try! My Twitter ID is UnlikelyVoyager (UnlikelyBoatBuilder is too long, apparently), and the URL is http://twitter.com/UnlikelyVoyager. Twitter me back, or leave a comment below, if you think this is worth while. Thanks, Chris!

09 July 2010

What Time is Noon?

Last time, we learned that we need to measure both the exact time of Solar Noon, and the exact height of the Sun over the horizon at Solar Noon. But when is Solar Noon? What time should we scamper out on deck to take our measurements?

If you've never studied celestial navigation before, you might think the answer is obvious. Just look at your ship's clock. 12:00 pm. Lunch time. Easy peasy.

If your ship's clock is a sundial, you'd be correct, because sundials run on Solar Time. And 12:00 pm solar time is exactly when we need to take our sight.

Unfortunately, your clock is probably not a sundial, but one of those new-fangled ticking ones with minute and hour hands, or maybe even a digital clock. And even the fanciest Chelsea ship's clock can't keep accurate solar time.

Why can't normal clocks keep solar time? The answer is incredibly interesting --  Bowditch devotes an entire chapter to it. Unfortunately, the explanation requires lots of math and mumbo-jumbo, so it will have to wait.

However, a picture can save me a thousand fairly technical words...

Suppose you wanted to know when it's Solar Noon in Jacksonville, FL, where the Blue Moon is now waiting patiently for me. The image below shows exactly where the Sun is over the earth, on July 9th, 2010 at 12:00 pm Eastern Daylight Time. Click on the image to see a larger version.

Position of Sun (yellow star) at 12:00 PM in Jacksonville, FL

You can see that the Sun is not due south of Jacksonville, but still dawdling out over the Leeward Islands (well, who can blame him?)

So we can't just look at our ship's clock to predict Solar Noon. On some days of the year, solar noon occurs before 12:00. On other days, it's after. So inconvenient. What can we do?

One solution is to start early. Go out on deck at, say, 10:30 am and start measuring the Sun's height with your sextant. If you measure every few minutes, you'll see the Sun climb higher and higher. At solar noon, it will start to go down.

But suppose you have better things to do with your time. Can we estimate the time of solar noon?

Estimating the Time of Solar Noon

Yes, you can. In fact, with a Nautical Almanac and a bit of math, we can nail it down to the minute. We'll get to that someday (maybe?), but for our Hello World! problem, we'll use a simpler, more concrete method to estimate Solar Noon.

First, set your navigation clock to Greenwich Mean Time. Using GMT eliminates a whole bunch of math and confusion. Explaining why is too complicated for our discussion, but trust me on this. Even when you're an expert, using GMT can save you tons of trouble.

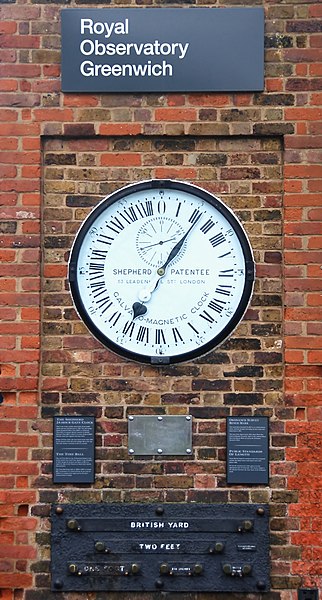
The easiest way to get GMT is to go right to the source, the Royal Observatory website.

GMT from the source
photo wikimedia commons

Next, start thinking in GMT, at least when you're doing navigation. Don't be converting GMT to local time. That way lies confusion, error, and ship wreck.

Put your GMT navigation clock where you can see it, and think GMT. Do it now, before you read any further, so you can read the rest of this blog while thinking in GMT time.

Even a crummy windup alarm clock set to GMT is better than nothing. You want to start thinking in GMT, rather than converting constantly to local time.

Got it? Okay, now look at an ordinary Time Zone map, like the one below. Click on the map for a larger image.
 
Click on this map for a larger image

You probably know that Greenwich, England is at Longitude 0°. Not coincidentally, it is in the center of the 'Z' time zone (the source of the word 'Zulu Time', used in all those Tom Clancy novels.)

The Sun moves across this map from right to left. It travels at a speed of 1 time zone per hour.

At approximately 12:00 GMT, the Sun will cross Longitude 0°, and the instant it does, it will be solar noon in Greenwich and at every other location on Longitude 0°. ('Approximately', because the actual time can vary by about 15 minutes, but we will ignore this complication for now.)

One half hour later, at 12:30 GMT, it will be solar noon in Casablanca, because the Sun moves west at 1 time zone/hour and you can see from the map that Casablanca is about half a time zone west of Greenwich.

"I told you... never mention solar noon again."

Get it? So if it is solar noon in Greenwich at 12:00 GMT, when will it be solar noon in Jacksonville, FL? See if you can figure it out from the map above. Just measure the approximate distance in time zones and add 1 hour per time zone, plus any needed fractions.

If you answered about 17:30 GMT, you are correct. Jacksonville is about 5.5 time zones west of Greenwich, so it will be solar noon in Jacksonville about 5 hours and 30 minutes after solar noon in Greenwich, or about 17:30 GMT

Try again. How about my current location, in Huntington, NY?

Yup. Huntington is almost exactly 5 time zones west of Greenwich, so it will be solar noon here today at around 17:00 GMT (in fact, it's at 16:58:49 GMT)

Too easy? How about Sydney, Australia, about 14 time zones west of Greenwich? When will it be solar noon over Sydney Harbor Bridge?

Sydney Harbor Bridge, under construction, 1925
photo wikimedia commons

If you add 14 hours to 12:00 GMT, you get 02:00 GMT the following day, or July 10th. See how handy the International Date Line is? This date change will matter to us, later.

So you now have a quick and easy way to estimate the approximate time of solar noon, any place on the planet. All you need is your navigation clock, carefully set to GMT, a time zone map, and your approximate location (called your Dead Reckoning (DR) location, in celestial navigation lingo.)

The time you calculate will be approximate, but that's all we need to get started, because we're going to be on deck well before Solar Noon to start taking sights. And after your first noon sight, you will know the exact time of solar noon at your location. The next day, it will occur at the same time, plus or minus a few minutes, depending on how fast you are sailing.

So, now that we know when to scamper out on deck, what do we do when we get there? That's what we'll talk about, next time!

Speaking of next time... if you'd like to be notified when I post a new 'lesson' (erratically, about 3 times a week), you can sign up for my super-sophisticated Automatic Notification Process. Actually, it's just an email, but Automatic Notification Process sounds better. I won't spam you, and you can de-sign up at any time.

>>> Next Episode: The Sights


If you enjoyed this episode of the Unlikely Boat Builder, please consider telling a friend about it, or posting a link on Facebook. Thanks!


Get Notified Automatically

I hope you're enjoying "The Unlikely Boat Builder" as much as I enjoy writing it. Over 250 people have asked for a way to be notified automatically when I post new episodes. I've figured out how to do this, so if you'd like to be notified, please click on the link below. I promise I'll never spam you (and Google will have my head if I do.)

Thanks for your interest!

-- John


Follow me on Twitter! My son Chris has been bugging me for a few weeks to use Twitter to make short, more frequent posts from my iPhone, for when I don't have the time for longer blog posts. I don't know how it will work out, but I'm willing to give it a try! My Twitter ID is UnlikelyVoyager (UnlikelyBoatBuilder is too long, apparently), and the URL is http://twitter.com/UnlikelyVoyager. Twitter me back, or leave a comment below, if you think this is worth while. Thanks, Chris!

08 July 2010

Hello, World!

My degree is in Computer Science, and over the last 30 years or so, I've had to learn many new programing languages. The classic way to get started with a new language is to write what's called a Hello World! program. This is a very simple program that just prints the words "Hello World!" onto the screen (or printer, or paper tape... but I date myself!)


Light-programmable biofilm displaying the Hello World message
photo wikimedia commons

If you can get these two words to print out, you won't know everything there is to know about the language, but you will have a good feel for how the language works. More important, you'll have the confidence you need to keep going.

With that in mind, I'm going to start by running through a kind of Hello World! celestial navigation problem. We'll take it one short, digestible step at a time, keeping the math and other brain twisting mumbo-jumbo to a minimum. The goal isn't to learn everything there is to know about celestial navigation. And it's not to memorize some procedure that doesn't make sense to you, or to learn how to plug numbers into a magic box.

No, the goal is to understand how a simple sight works. Once you have that basic understanding, it won't be magic anymore, and you'll be ready to keep going with more advanced sights.

So, by the end of this series of short blog posts, you should have worked your first sight and -- more importantly -- understood what you did. Let's get started.

Meridian Passage of the Sun

For our Hello World! problem, we're going to do a traditional Noon Sun Sight. This was one of the first sights used by sailors, and the easiest one to understand.

In fact, you probably already have an intuitive understanding of how it works, even if you don't know all the details.

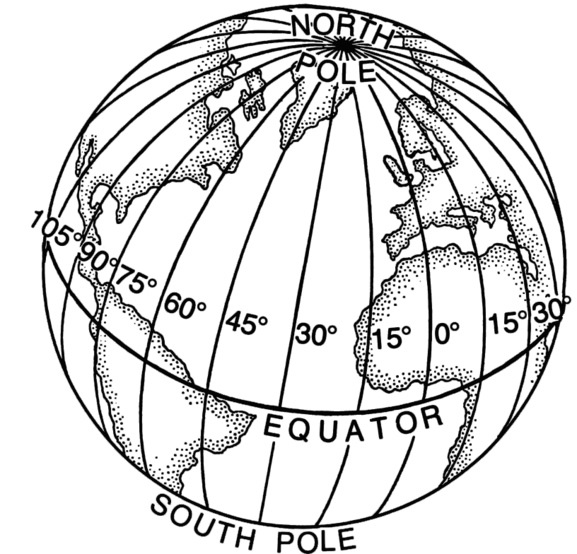
You know, for example, that the Sun rises in the morning and climbs higher and higher in the sky, until it reaches it's peak at 'noon'. At that precise moment, the Sun is crossing your longitude and thus it is Solar Noon at your location.

Lines of Longitude are vertical
Lines of Latitude are horizontal
image wikimedia commons

You also know that how high the Sun climbs at noon depends on your latitude. If you were sailing on the Amazon, near the latitude of the equator, you'd probably expect the sun to be directly overhead, since the Sun travels along the equator, right? (Not exactly, but we'll get into that later!)

Shore-side on the Amazon
image wikimedia commons

On the other hand, if you were circumnavigating Iceland, or Tasmania, you'd expect the sun to be much lower in the sky at Solar Noon, maybe even just peeking over the horizon, if it happened to be winter (but what are you doing sailing around Iceland in winter?)

You know the Sun does not travel directly over Iceland or Tasmania, but sensibly sails far to the south (or north) in the warm and sunny climes where women wear fruit on their heads.

Okay, we're almost there. Let's review what you know from your every day experience:
  1. The exact time of Solar Noon depends on your longitude -- how far east or west you are
  2. The exact height of the Sun at Solar Noon depends on your latitude -- how far north or south you are
 Now, just turn those two facts around:
  1. If you measure the exact time of Solar Noon, you can find your longitude
  2. If you measure the exact height of the Sun at Solar Noon, you can find your latitude
It's as simple as that. With a few details to make it interesting, of course.

Okay, so we just need to hop out on deck at Solar Noon and take a shot, right? But when is Solar Noon? I went outside at 12:00 today and it looked like the Sun was still busy climbing. What gives?

We'll tackle that problem, tomorrow.

>>> Next Episode: What Time Is Noon?


If you enjoyed this episode of the Unlikely Boat Builder, please consider telling a friend about it, or posting a link on Facebook. Thanks!


Get Notified Automatically

I hope you're enjoying "The Unlikely Boat Builder" as much as I enjoy writing it. Over 250 people have asked for a way to be notified automatically when I post new episodes. I've figured out how to do this, so if you'd like to be notified, please click on the link below. I promise I'll never spam you (and Google will have my head if I do.)

Thanks for your interest!

-- John


Follow me on Twitter! My son Chris has been bugging me for a few weeks to use Twitter to make short, more frequent posts from my iPhone, for when I don't have the time for longer blog posts. I don't know how it will work out, but I'm willing to give it a try! My Twitter ID is UnlikelyVoyager (UnlikelyBoatBuilder is too long, apparently), and the URL is http://twitter.com/UnlikelyVoyager. Twitter me back, or leave a comment below, if you think this is worth while. Thanks, Chris!

07 July 2010

Celestial Navigation Fun!

Like a lot of wooden boat nuts, I was probably born in the wrong century. I like the Blue Moon's gaff rig, I use kerosene lamps, and I much prefer paper charts to electronic ones (my paper charts never 'go blank', as Roger Fitzgerald's did at a critical moment during the 2010 Jester Challenge. How awkward!)

I also like celestial navigation.

From the 1728 Cyclopaedia
image wikimedia commons

Why, in this GPS age, would I enjoy anything so unlikely? Why would I want to laboriously calculate my position on planet Earth by looking at real stars, when the artificial stars of the GPS system are happy to do all the sights and calculations for me?

It's not because I think the GPS system is 'unreliable', or I fear the bad guys will shoot the satellites out of the sky. In fact, I figure the odds are pretty darn slim that I'm going to need my GPS just as WW III starts.

And it's not because my simple Garmin 72 GPS needs a backup. Frankly, the best backup for a GPS is... another GPS.

No, the reason I like celestial navigation is the best one of all: FUN.

Now I admit, this is the same sort of fun that people get from doing the Sunday Times crossword puzzle, or writing a computer program, or building a wooden boat, for that matter. It's hard to explain this type of fun to people who like doing everything the easy way, but if you're reading this blog, you probably share this odd pleasure.

(Secret bonus pleasure: it's also fun to lord it over the 99% of sailors who don't know celestial navigation, and never will.)

It's always been that way. The common sailor, no matter how experienced, has always held in awe the Captain and his ability to find his way across the trackless oceans by looking at the stars.

Jim Hawkins, overhearing the conversation, below
image wikimedia commons

Remember Treasure Island, when Long John Silver's band of thieves were impatient to get rid of Captain Smollett and take over the ship? What did the ruthless but practical Long John remind them?

'What I say is, when are we going to do it?'  growled the coxswain impatiently.

'When! by the powers!' cried Silver. 'I'll tell you when. The last moment I can manage; and that's when. If was sure of you all, sons of double Dutchmen, I'd have Cap'n Smollett navigate us half-way back again before we struck.'

'Why, we're all seamen aboard here, I should think,' said the lad Dick.

'We're all foc's'le hands, you mean,' snapped Silver 'We can steer a course, but who's to set one?”


Ah, the inner secret of sailing! The one that garnered respect, even from pirates. Yup. That's what I call fun.

I brought my sextant along on the Blue Moon, but I haven't had much chance to use it, what with being fairly close to shore, or in the ICW, or tucked into an anchorage at dusk and dawn. Whenever I had a chance to 'shoot' the Sun or a nice star, there always seemed to be a shore under it, instead of the horizon. And everyone knows you need a clear view of the horizon to get a shot, right?

Well, a couple days ago, I just happened to read about the 'Short Dip' tables. I'll explain these in more detail later, but the short version is that these special tables let you take sights even when you don't have a clear view of the horizon. At least in certain circumstances.

This got me fired up about using my sextant, but of course, I'm totally out of practice. And celestial navigation isn't something you can do without practice. At least I can't.

So I've decided to use this break from the Blue Moon to brush up my calculations, and test out those Short Dip tables. And I'm going to blog about it, so maybe I won't have to drag out those impenetrable and stupefyingly dull books the next time I need to refresh my memory.

photo wikimedia commons

If you've always wanted to learn how to steer by the stars, this might be a good way to get your feet wet. I'm going to start off with the simplest sight possible -- a noon sun sight -- and show how to calculate your position with the minimum amount of math and mumbo-jumbo possible. If I do my job right, you should say to yourself, "hey, this celestial navigation stuff isn't so hard, after all!"

If enough readers get into it, maybe I'll even add a new feature to my Blue Moon blog -- a 'Where Am I?' feature. I'll take sights and print them in my blog, and you can use them to figure out where I am.

Now, come on... what could be more fun than that???

Well, if you are interested, shoot me an email at john@unlikelyboatbuilder.com, just so I know I'm not completely crazy. If there's enough interest, I'll get into taking other, more complicated, types of shots.

No sextant necessary. The only tools you'll need to get started are a pencil, some graph paper, and maybe a simple calculator.

>>> Next Episode: Hello World!


If you enjoyed this episode of the Unlikely Boat Builder, please consider telling a friend about it, or posting a link on Facebook. Thanks!


Get Notified Automatically

I hope you're enjoying "The Unlikely Boat Builder" as much as I enjoy writing it. Over 250 people have asked for a way to be notified automatically when I post new episodes. I've figured out how to do this, so if you'd like to be notified, please click on the link below. I promise I'll never spam you (and Google will have my head if I do.)

Thanks for your interest!

-- John


Follow me on Twitter! My son Chris has been bugging me for a few weeks to use Twitter to make short, more frequent posts from my iPhone, for when I don't have the time for longer blog posts. I don't know how it will work out, but I'm willing to give it a try! My Twitter ID is UnlikelyVoyager (UnlikelyBoatBuilder is too long, apparently), and the URL is http://twitter.com/UnlikelyVoyager. Twitter me back, or leave a comment below, if you think this is worth while. Thanks, Chris!