 |
| Pythia, the Oracle at Delphi |
After entering her trance (helped by chewing a few laurel leaves and breathing the volcanic fumes that emanated from a crack in the floor), she became possessed by the voice of Apollo, and could answer any question posed to her.
There was a catch, though... Pythia, possessed as she was, spoke in a language that sounded very much like gibberish to ordinary people. Her priests -- luckily -- could understand the language of the Gods, and were able to interpret Apollo's utterances for mortal men.
"Seat yourself now amidships, for you are the pilot of Athens. Grasp the helm fast in your hands; you have many allies in your city." -- Pythia's advice to SolonGoogle is today's Oracle. Ask it any boatbuilding question, and you will receive the correct answer.
And 5,435,232 wrong answers.
Well, 'wrong' might be overstating it. Everyone has an opinion on the Internet. The trick is separating the real experts from those chewing laurel leaves and breathing hallucinogenic fumes.
If only the priests of Apollo were still around...
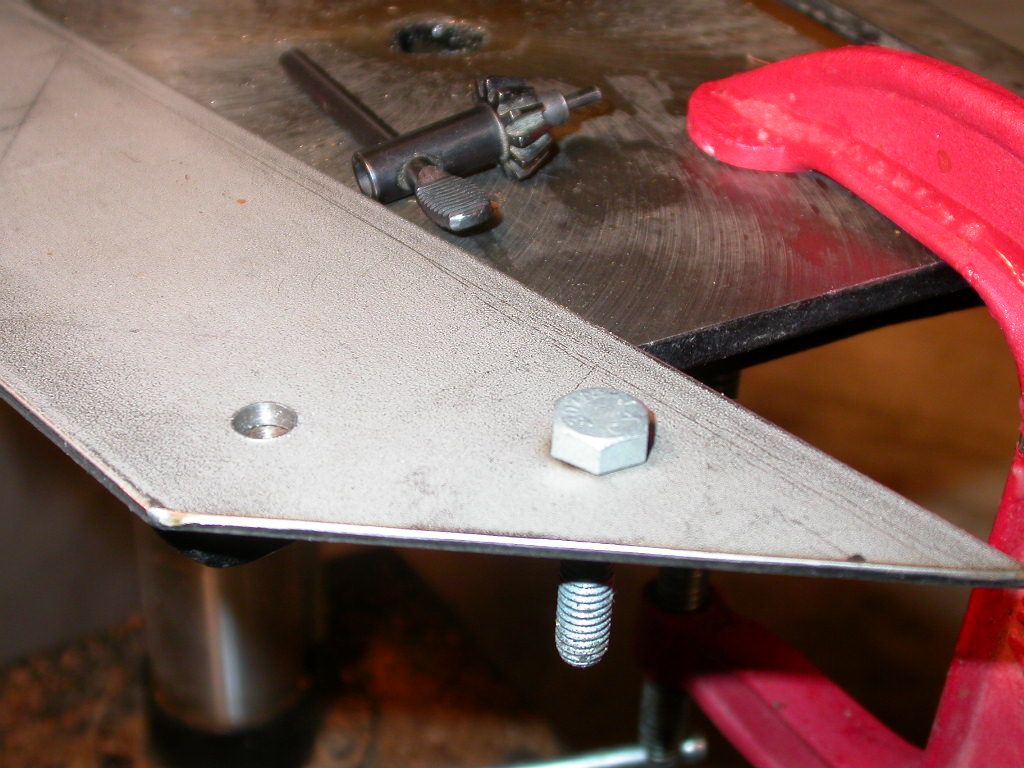
"Love of money and nothing else will ruin Sparta." -- Pythia's advice to the Spartans (ignored)I ran into the problem of too much advice while trying to finish my boomkin. I wanted to tie the two ends of the boomkin together with stainless steel plates -- one above and one below. I'd mount a bracket for the mizzen sheet block on the top plate, and one on the bottom for the boomkin stay. This would be simple, strong, and streamlined.
So I ordered some 1/8" x 3" x 2' stainless steel from the Metals Depot -- enough to cut the two plates from. I considered various ways to cut the steel myself, but for once came to my senses and gave the job to Gary at Master Weld in East Northport. For $10, he had it done the next day, and did a much better job than I could have done with a hacksaw.
However, I wanted to drill the holes myself, to make sure they were in the right places. I had a drill press; I had a new-sh 5/16" drill bit; I was ready to drill!
To ensure the top and bottom holes lined up properly, I drilled them both at the same time, by stacking the two plates and clamping them in a drill vice. The drill made the first 3 sets of holes with no problems, but on the 4th and final set of holes... disaster.
First the drill bit started smoking, then it glowed dull red...
"Just a bit more!" I said, urging the drill bit to a final, heroic effort.
No good. The hole refused to get any deeper. My drill bit was done for.
"Okay, no problem," I thought. "I have another 5/16" bit. I'll just use that."
Tried again. Again the drill bit smoked and then began glowing like a nuclear fuel rod.
I stopped the drill press and inspected both the hole and the drill bit. The end of the bit was narrower than the rest of it. The hole had actually cut down the drill bit.
This flipped my limited knowledge of metalworking on it's head. Could the hole now be harder than the drill bit? Impossible!
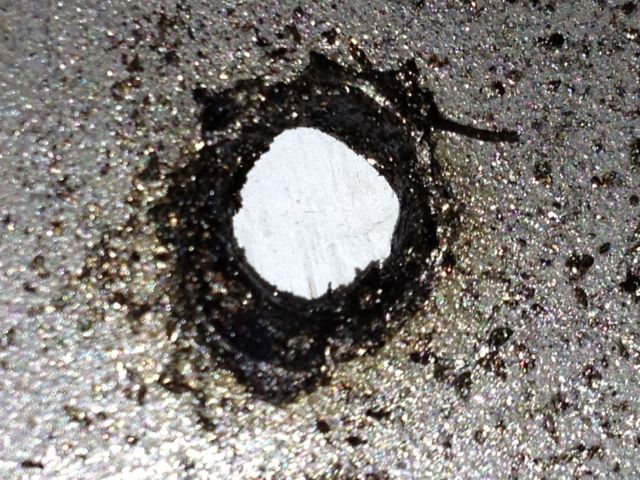 |
| A hardened hole |
In fact, this is how the Greeks made swords for Achilles and his Iron Age chums. Sword makers hammered the edges of swords to stretch the metal to a thin, sharp edge. Deforming the metal work-hardened the edge and helped keep it sharp. Brilliant!
Having successfully re-discovered an iron age technique, what was I to do next?
Consult the Oracle, of course! If you can harden a hole, there must be a way to un-harden it.
Problem was, while I found a lot of advice on the Internet, much of it was conflicting, and some of it sounded down-right daft. I wasted a few days investigating some of the daftier ideas (why do bad ideas always sound so interesting?), then complained to Helena.
"Why don't you ask Gary?" she said.
"Ask an expert, you mean?" I said, dubiously.
"I know that's a bit like asking for directions, but..."
A half-hour later, I showed the piece to Gary.
"Melted the drill bit in the hole, eh?" he said.
"Looks like it," I said, pretending I knew all about it. "I was hoping you had a special tool to fix it."
"No magic tools here. I'd have to do the same thing you are going to have to do."
"Me, huh?"
"Yup. With your drill bits. Here's what you have to do..."
"First sacrifice to the warriors who once had their home in this island,Whom now the rolling plain of fair Asopia covers,Laid in the tombs of heroes with their faces turned to the sunset..."
Back in my shop, I gathered the needed tools. This included a brand new set of cobalt drill bits -- slightly more expensive bits that are hard enough for stainless steel -- and a set of rotary grinding burrs.
First lesson: when drilling stainless steel, use a slow rotation speed. My Delta drill press has a drive belt that can be positioned on several pulleys to vary the speed. I put it on the slowest speed pulley... 610 rpm, I think it is.
Next, I attempted to use one of the rotary burrs to grind the melted drill bit out of the hole, but this was a failure. The metal in the hole was harder than the grinding burr, and it was the burr that got ground down, not the hole. I'm sure it's possible to get really good quality grinding burrs, but not at Harbor Freight. I put one of the expensive sets on my Amazon wish list, and moved on.
Gary warned me that the grinding might not work, so the next step was to select a cobalt drill bit that was just a little bit bigger than the hole. The idea was to cut the hardened steel out of the hole with the drill bits, one baby step at a time.
To make a long story short, I took my time and ran through every drill bit, from the smallest one that fit the hole, right up to 5/16".
As Gary insisted, I used plenty of cutting oil and took my time, making sure the bit didn't smoke or get too hot. I kept the Oracle's warning in mind as I proceeded:
"If anything glows, you're done for!"And much quicker than it's taken to explain, the job was done.
As usual, when you do a job right, it's kinda boring. No-drama metal working. Just what I needed.
 |
| Hardened hole, removed! |
 |
| boomkin bracket test fitting |
 |
| Another angle |
1. I haven't drilled the second set of holes in the spars, yet. I want to test fit the whole thing on the Blue Moon as a sanity check before drilling the second set. Yes. I'm paranoid.
2. I haven't decided what to do with the ends of the boomkin spars. At the moment, I'm leaning towards sawing them off square with the end of the bracket, but I might live with them the way they are for a while... What do you think?
So, almost done with my boomkin project. I hope to have it installed by this weekend. Almost time to change gears from building to sailing!
Make your own nature, not the advice of others, your guide in life." -- Pythia's advice to boatbuilders.
>>> Next Episode: Sticking To It
I also learned the hard way to purchace cobalt bits, and a cutting oil suggected for stainless steel. Nice finished job by the way.
ReplyDeleteThanks. I never heard of cobalt bits before this. Live and learn, eh?
DeleteLeave the boomkin ends as-is. You're getting kinda close the already drilled holes, you'd sure hate to have it start to delaminate.
ReplyDeleteNice work, taken all together ;-) And thanks for the insight on such things, all thru your postings.
ReplyDeleteThe ends, as is, don't quite look good. If you cut them off to match the plates, you'll have to finish the cut ends. Why not fit in a wedge of some Holly, or such, and coat it with epoxy?
thanks for all your work and posts,
Al
New Bern,NC
"There is nothing -- absolutely nothing -- half so much worth doing as simply messing about in boats"
Ratty, to Mole
I vote for leaving the ends as-is...
ReplyDeleteJohn, I too would leave the ends on as they are, or perhaps infill the gap with some decorative wood and seal over. Do you not need to drill some more holes in the stainless steel to attach the fitting with? Maybe your trusty metalworking friend could weld them on?
ReplyDeleteI'd cut them square, close to the metal.
ReplyDeleteThen I'd overlay the metal strap with a piece of matching wood extending down over the ends of the boomkin parts.
Or, I would if I had your skill and patience.
I agree with "anonymous's" concern about delamination and with Al's suggestion of filling in the gap. No structural potential problem and a neat and attractive fix.
ReplyDeleteCutting it square will make it look....cut off...like somethin's missing. Put a filler piece in to continue the great lines you created by bending the wood. You've come this far, make it look cool.
ReplyDeleteI was going to say cut them off till I read the above comment. Continuing the great lines you created sounds like a great idea.
ReplyDeleteI was going to say cut them off until I read the above comment. I agree, continue them on since once you have already done looks great.
ReplyDeleteI should have mentioned that I will need to remove the boomkin every fall, since the BM winters stern-to on a dock, and the boomkin hangs too far over the dock.
ReplyDeleteSo any filler would have to be removable, as well.
With all the fasteners in the middle laminate, and close to the end, I'd worry about delam from stress. A binder bolt in the end of each spar, across the lams .. or better yet, a neat copper rivet .. positioned midway between the two holes, will give mechanical support to those vulnerable ends.
ReplyDelete