Research is a double-edge sword.
I've been reading a boatload of beginner sailing books, trying to see how professionals approach the task of teaching a newbie to sail. The new ones assume you are learning in a small boat, like a PIXel or other trainer.
| 14' PIXel trainer |
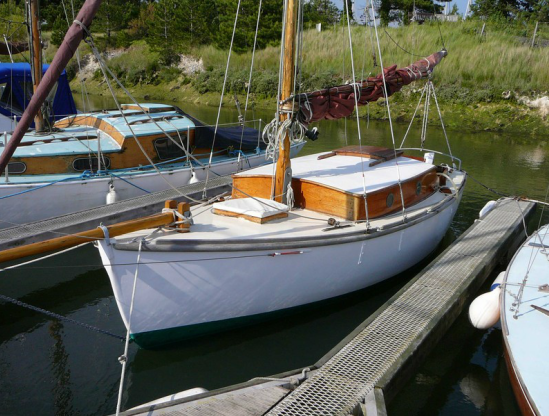 |
| Cooke's own Blackwater Sloop... still looking beautiful after all those years! |
Naturally, research, good planning, and good intentions are never left unpunished... but I'm getting ahead of myself.
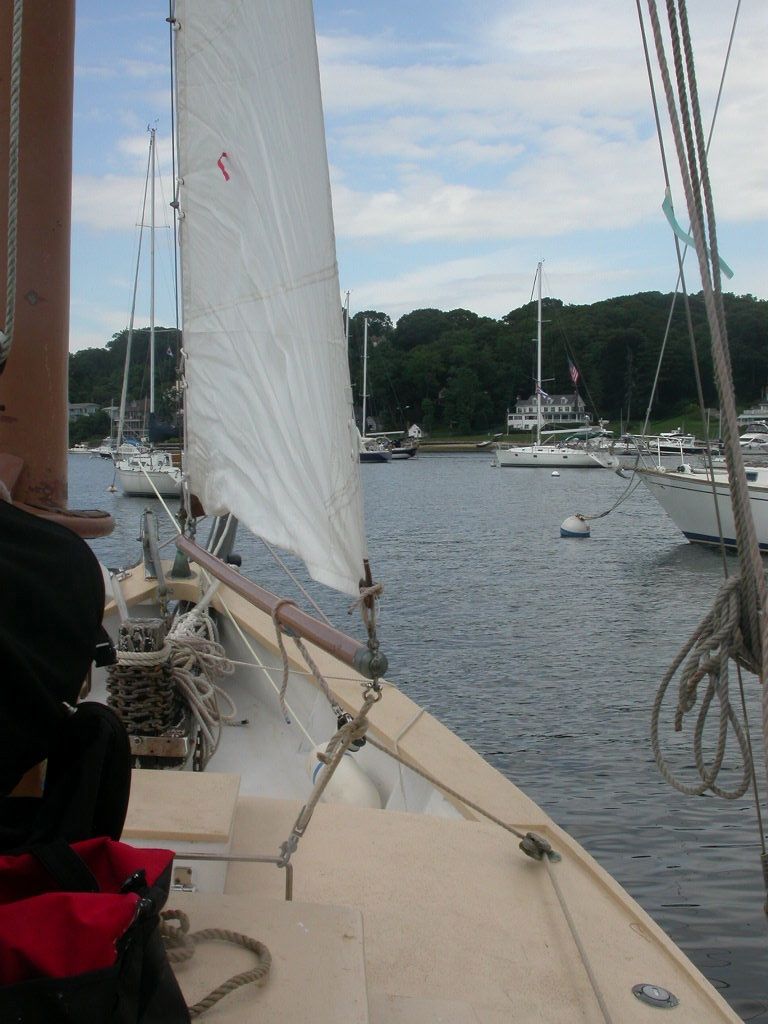
For Lesson 2, I rowed Helena out to the Blue Moon on a beautiful sunny morning. The wind was light, but strong enough for a little sail, I thought.
Helena and I had discussed lesson strategy and decided that the only way to learn to sail was hands-on experience. I could get her head spinning with words and theory around the dining room table, but words only become concrete when you've got lines in your hands and wind in your hair. Our lessons would be conducted on the water.
But how do you tackle learning a complex system like the Blue Moon? A system with 5 sails, 6 halyards, 6 sheets, assorted downhauls and outhauls and backstays?
Answer: one piece at a time. My idea was to get Helena thoroughly familiar with each sail, taken one at a time, starting with the staysail: how to hoist it, how to use it while sailing, and how to strike it.
Conveniently, this will give me a chance to talk about the changes I've made to the Blue Moon's rigging, and why. And the staysail is an excellent place to start, for both reasons. Plus, this blog will be a good reference for Helena to refer to in the future.
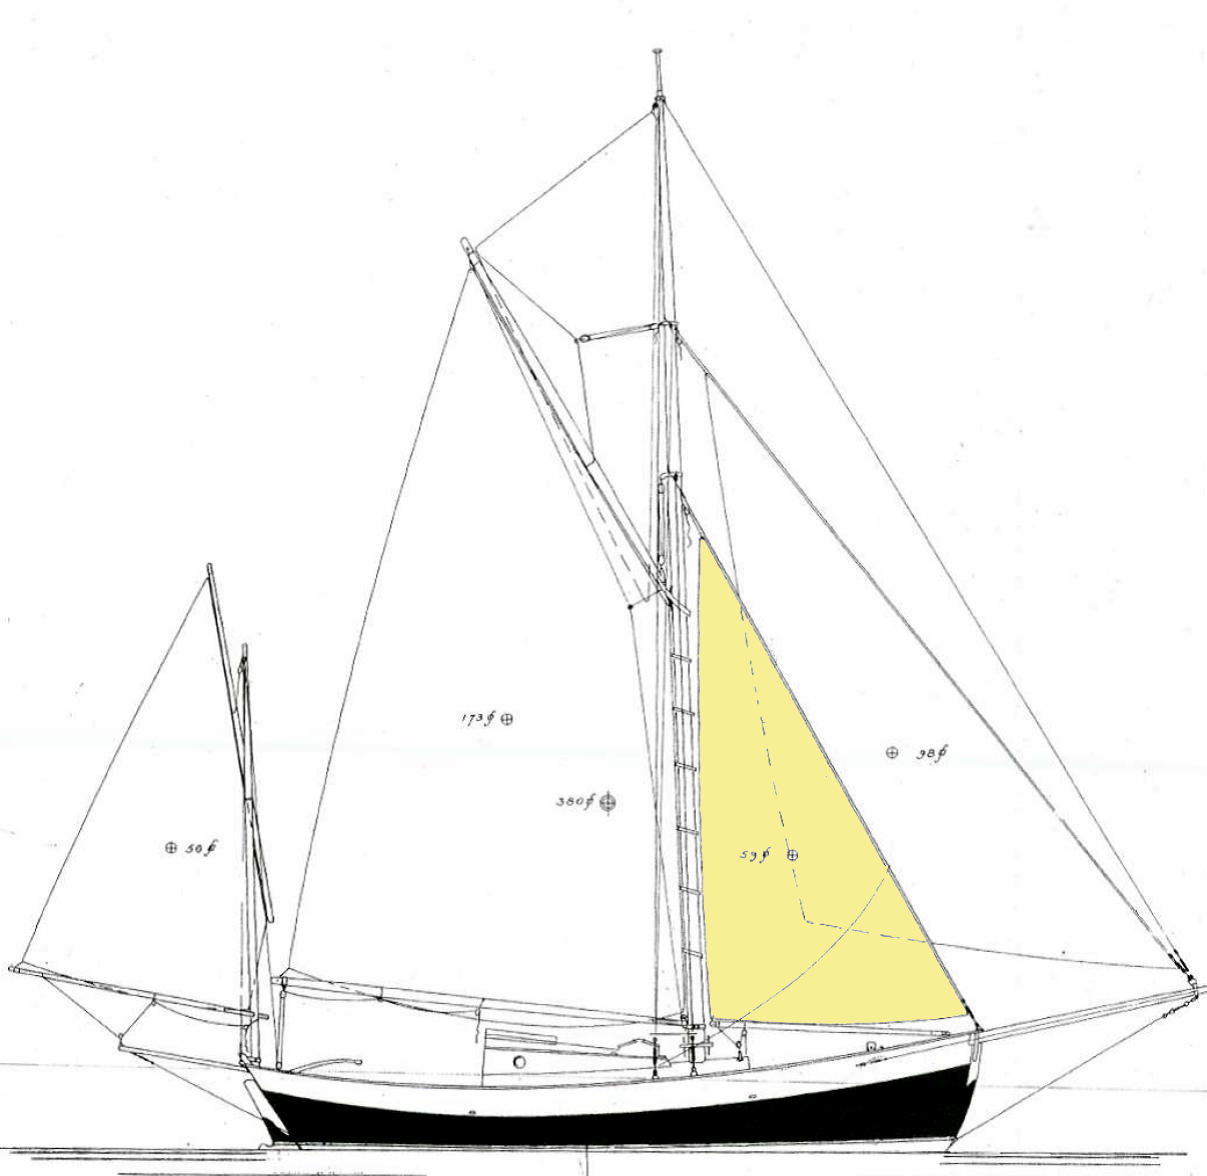 |
| Staysail |
The staysail is hanked onto the BM's forestay. It's a small sail -- just 59 square feet -- but don't let it's size fool you. It's a powerful sail on the wind, and helps balance the BM's big main.
It's also a seemingly simple sail to rig, but like many things on the Blue Moon, the devil is in the details.
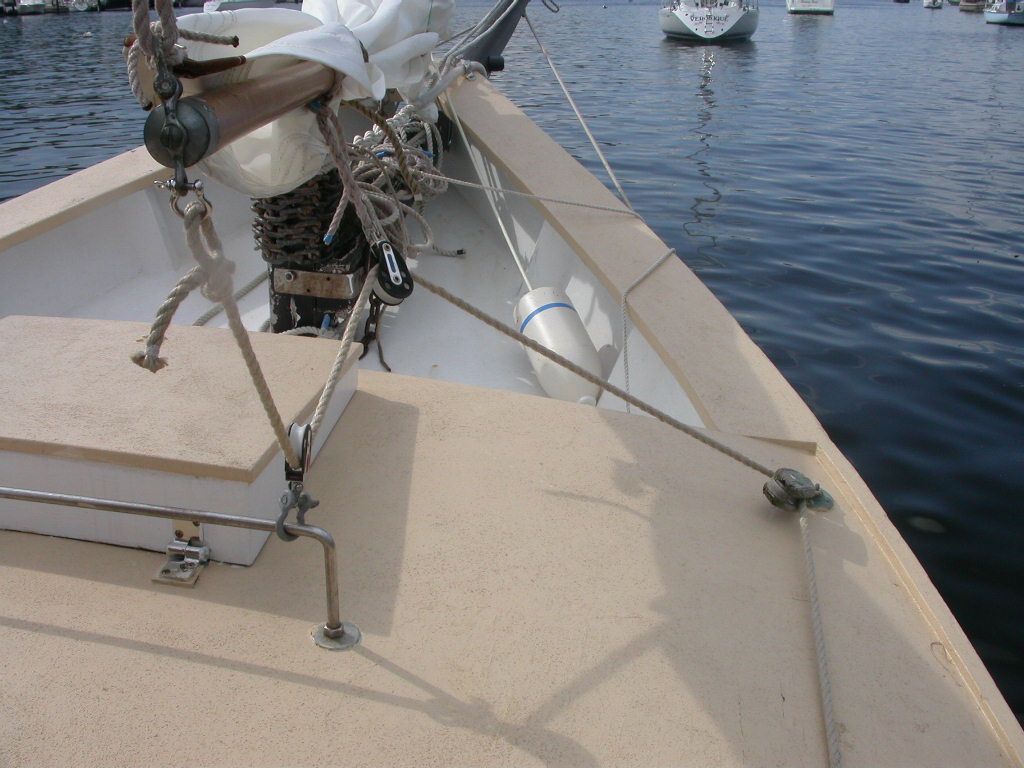
Here's what it looks like after it's cover has been removed. I tie the sail to the boom with two sail ties. The halyard is tied off to the end of the boom (with a bowline) as a topping lift.
 |
| Staysail tied to boom |
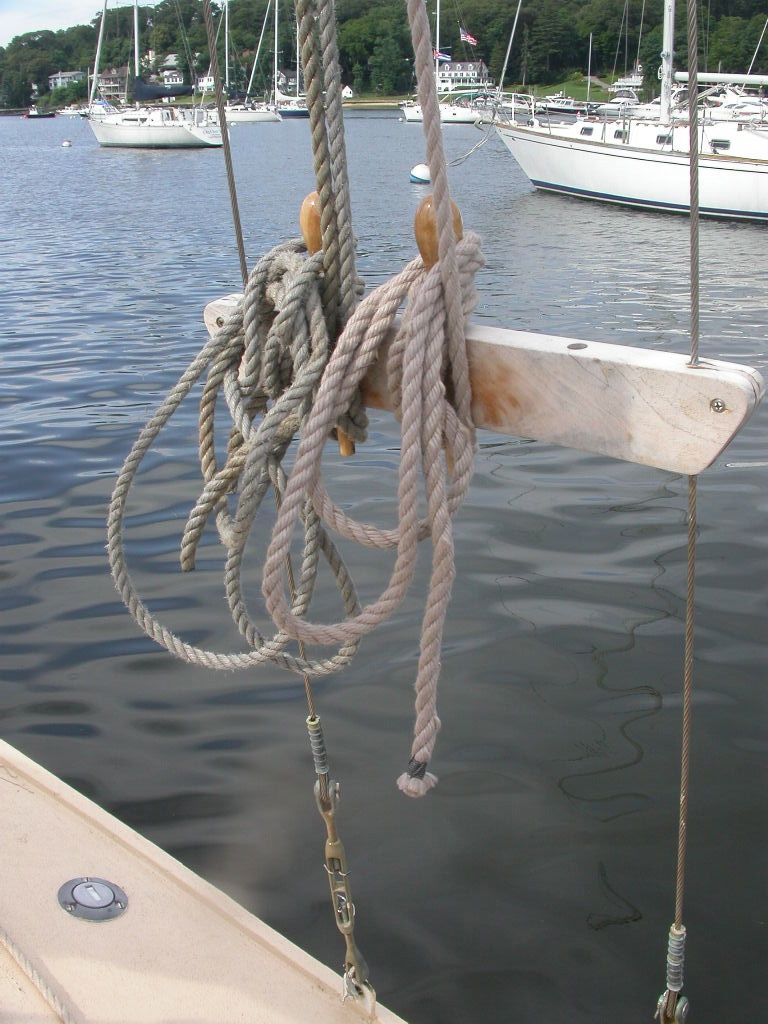
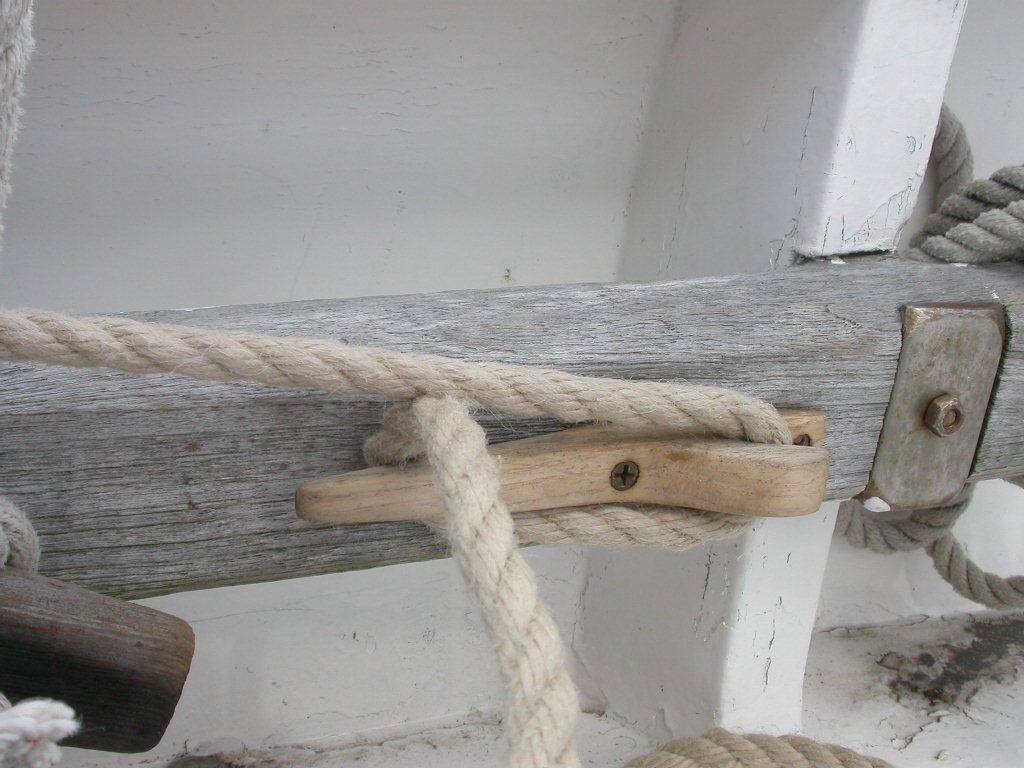
As part of my no-drama sailing program, every line has it's own cleat on the BM, and the cleats are arranged in a logical, hopefully easy-to-remember order.
The halyards for both headsails run to the starboard pin rail. The jib -- which flies from the end of the bowsprit, forward of the staysail -- is on the forward most pin. The staysail halyard is belayed on the middle pin.
 |
| Headsail halyards |
The sheet is rigged in a rather simple way. Yes, I say simple, but I sailed the Blue Moon for 3 years and changed the way I rigged this sheet 3 different ways before striking on this simple arrangement. I'll explain the reasons why in a moment.
 |
| 3rd version of sheet lead |
To hoist the sail, you just move the halyard from the end of the boom to the head of the sail, give the sheet some slack, and hoist away. The luff of the sail should be as tight as you can get it, so pull down hard on the halyard and then belay it.
 |
| Sail hoisted wrong: notice how tight leach is, & how slack luff it. Duh. |
Duh. I was in a hurry when taking these photos, but that's why I call this a How-Not-To blog! Overhaul those sheets before hoisting those sails!
Anyway, here are the details I promised. First, the sheet rigging.
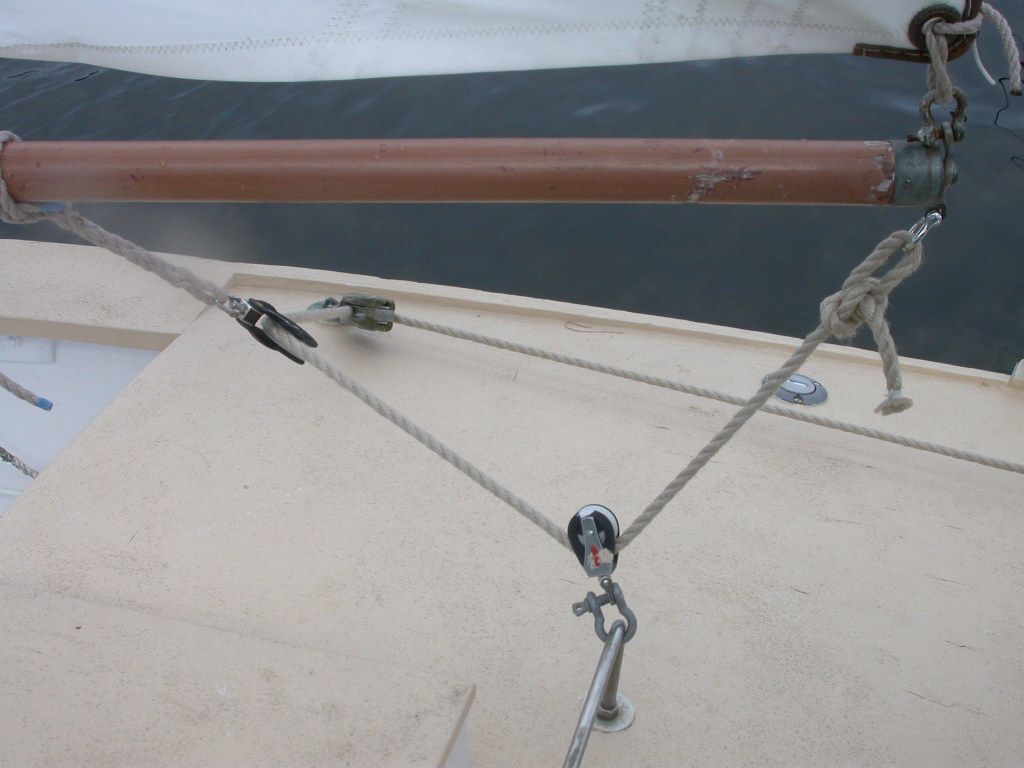 |
| Another view of the sheet |
When I bought the BM, there was a single block with becket hanging from the end of the boom. The sheet was tied to the becket, ran down through a block on the traveler, back up through the boom, to the block on the deck, and back to the cockpit.
This was practically the same as I have it now, with one big difference: the two parts running down to the traveler block were so close together that they continually twisted around each other, which was a real pain.
Worse, I thought, was the fact that the sail would not self-tack without adjusting the sheet on every tack. That's because of that turning block on the deck. The geometry is a bit hard to visualize, but imagine we are sailing on the port tack. In that case, the staysail might be adjusted just right the way it is in the photo above. Now imagine tacking. The block on the deck will prevent the boom from tacking across to the other side of the boat. You need to un-cleat the sheet and let the boom run out to the other side.
You have the reverse problem when tacking from starboard to port: In that case, the sheet will be too long after tacking, and will have to be sheeted in.
But staysails on booms should be self-tacking right? Why else put them on booms? Something was wrong!
So I changed the sheet lead by adding another block at the forward end of the boom. This allowed the sail to self-tack without adjustment. It had some other problems, but I lived with it that way for all last summer.
Then, as part of my no-drama sailing program, I decided I needed to be able to heave-to quickly and easily, with either the jib or staysail. The jib was no problem, but how to haul the staysail to windward?
For most of this spring, I tied a line to the end of the staysail boom, but there wasn't a convenient place to tie it off to, to heave to.
Then I realized that one always wants to heave-to on the starboard tack. This gives you the right of way over just about every other boat (see Rules of the Road and you'll see why.)
"H'mmm..." I thought. A light slowly brightened in my head. "Maybe that's what that block on the deck is for!"
And so another mystery of the Blue Moon was solved. I removed that extra block, lashed a block to the boom as shown, and voila, she works much better:
- the two parts that lead down to the traveler are too far apart to twist around each other
- the sheet doesn't foul the Sampson post anymore when tacking (as it did when the block was at the forward end of the boom)
- the sheet doesn't get caught on the edge of the hatch cover anymore
You do have to adjust the sheet when tacking, but adding a dedicated jam cleat (easy to adjust with one hand) minimized that problem. Generally speaking, I ignore the foresail until we're settled on the new tack, then adjust the staysail.
 |
| Jam cleat in cockpit |
So, after explaining all this to Helena and having her run the sail up and down several times while on the mooring, it was time to go for a little sail. And this is where -- I admit it -- I went slightly wrong.
I mentioned earlier that I've been reading all these olde-time sailing books. Now, of course, few of these boats had reliable engines, and anyway, it wasn't manly to depend too much on them. So all these books place great emphasis on being able to sail without an engine. And naturally, all olde-time sailing lessons start with how to sail off the mooring.
Brilliant! I thought. We'd sail off the mooring, sail around Huntington Harbor, and then sail back to the mooring. We'd save the 1/2 hr it normally takes to get to the wide-open Huntington Bay and back, and really sharpen Helena's sailing skills (not to mention mine!)
So after playing with the sails on the mooring for a bit, we planned how to sail off the mooring, through a few boats to the channel, where it would be easy to sail up the harbor.
The wind and tide were running in the same direction, so I worked out a plan for getting under way, explained my plan thoroughly to Helena (who was a little doubtful, but game), and when I thought we were ready, Helena cast off the mooring lines.
Well, I'm sure Helena will tell you the rest of the story. Bottom line: I forgot the dingy. My bad.
But no harm done. We motored free of the mooring lines and out to the channel. We sailed around a bit and sailed back to the mooring without mishap.
Lesson learned (I hope): Never panic. You can solve any sailing problem, as long as you're thinking straight.
And that's a lesson more important than the name of any old rope.
From Helena: BLAME IT ON THE DINGY
Our sailing lessons had been interrupted by several weeks of parental visitors. First my mother in law, who is not crazy about sailboats, then my parents. A few years ago, when I told my mother we bought a sailboat, she casually commented “Even if I had a billion dollars, I would never buy a boat”. So sailing lessons and parental sailing expeditions were a bit out of the question.
But I knew John was waiting patiently all along, and as soon as the house emptied out, he was ready to “let the lessons commence”.
We did have that one lesson I talked about last time -- the one about how to coil a rope -- and I was looking forward to the next lesson, hoping it would be about learning how to tie a knot. Without leaving the mooring, of course. Knowing that there are about 500 different ways to tie a sheet or a halyard or a rope, I secretly thought that the winter would be upon us before I ran out of knots to learn. Haha! what a plan.
Little I knew (although I should have suspected), John's plans were more ambitious than mine. One day at lunch, a sudden silence descended upon John’s face and I knew his plan for the next lesson was about to unfold. He opened the Blue Moon's plans and a sketch book, and took out a pencil. I knew the future of my summer was in his hands. Goodbye knots.
A sailboat is just a boat with sails, he said. Learning how to sail is mainly learning how the sails work. Well, I know it is not that simple, but John and I are both teachers and during first piano lessons I always tell new students “what you learn today is all you need to know about how to play the piano, you will have the next 15, 20 or 40 years to get good at it”. So, I knew exactly what he meant.
Since we have 5 sails on the Blue Moon, we probably will need about 5 lessons. Ok, I can handle that.
So off we go with the first lesson. John was very patient, he drew the boat and all the main parts of the sails and their names. I was pretty impressed by his drawing.
[drawing goes here]
I learned about fore and aft, bow and stern (the physical front and aft), port and starboard (meaning left and right side of the boat... we have two cats named Port and Starboard, so I visualize them on the boat to remember which side is what.)
Mast, boom, stays, shrouds, gaff... the things on the boat that are made out of wood or metal, they can really hurt you if you are not aware.
Foresail, mainsail and its parts, luff (the side of the sail that faces the wind, I think of fluff ) and leech (the back of the sail, can’t think of anything), head (top of the sail) and foot (bottom of the sail, duh). And then there are the cleats, pin rails and other rails used to tie the ropes on.
Having this brief overview now we are ready for the second part of this lesson, the practical lesson.
It’s a beautiful day, sunny and breeze, but not enough wind to go out and sail. I’m loving it. I am thinking of the suntan I will get, since we have to stay on the boat and have another descriptive lesson, maybe even some knots. I have my bikini on.
Foiled again! John has plans for this lesson, and like a good teacher, by Jove, he is going to give it. He states solemnly “today you are in charge of putting up the foresail, the mainsail and since there is not much wind we will try something I have never done before.... we are going to sail around the harbor”. [gulp]
Forget the suntan and the bikini. As soon as we get onto the boat I start opening the cabin hatch (check), taking the sail covers off (check), remove sail ties (check), ... “Come Helena, you must learn how to turn the engine on”. Where's that come from?
That was scary, I am supposed to lean over the stern, find a flappy handle, pull it until I hear it snap with a “bing”, lower the engine to the water (super heavy by the way), squeeze a rubber ballon attached to a hose until it gets filled, pull throttle out, press black button until engine starts, make sure the engine is “peeing”, adjust throttle to idle, and voila, rest. Uff. Did it.
I was glad to get back to the sails. First the foresail, untie the halyard from the end of the boom, tie it with a bowling knot [John: it's bowline, silly!] to the head. I learned the bowling knot a while ago, way back when John gave me pieces of rope to practice with. The secret is to use the rabbit story, which according to John every sailor uses it, but none of them will ever admit. Pretty cute... rabbit comes out of the hole, goes around the tree, goes back in the hole. Can you picture manly sailors thinking that every time they tie a bowling knot? I can, and I love it.
Time to lift the sail. I was wondering what would happen after we lift the sail. Afterall, there was bit of wind, but John assured me that if we let all the lines loose and stayed attached to the mooring we are not going anywhere. I raise the sail, using the halyard rope, and after the sail is tightly stretched, I use my newly learned fastening technique and tie the halliard around a pin rail, finishing with a nice and neat rope coiling. I got A+ on all my ties that day.
Halyard versus sheets; I am going on a hunch here trying to make a distinction between them. Please correct me if I am wrong, but to make it clear in my mind, halyards influence the sail vertically, sheets; horizontally. So next time I have to pull one or the other I think up or sideways and hopefully I get the right one.
I raise the main sail and the boat is ready to take off. John goes on and on about how we are going to sail out of this tight spot. All I can see and focus on is that there is a lot of very expensive boats all around us, all swinging in random directions and I just cannot imagine going through the small channel with the Blue Moon and not taking any of them as tows.
While my adrenal glands are getting ready for action, John is going on and on about the currents, the wind coming at this or that angle, how we are going to tack while moored and how I should be holding the foresail boom until I feel it has some resistance, but not too much, then I should take the ropes from the big post in the front of the boat and release the mooring and then we will go nice and easy.
Too late, the adrenaline has kicked in and I have no idea of what he was talking about, all I could think is why? Can we just be happy that the sails are up, that I did great loops with the ropes, that the sails are up and that the motor is running? Can we go home now?
No such luck. Oh well, if I have to do it, whatever it is, I’ll do it. Just before we started the maneuvering, I looked once again pleadingly at John and asked him if he was sure of what he was about to do. “Of course, trust me, I know exactly I what I am doing, and I will have the engine running just in case”. Great, let’s go.
I hold the foresail boom into the wind, the boat starts turning, I let go of the ropes that hold the boat to the mooring, and we are on our way. Wait, we are not going anywhere! The mooring is on the port side of the boat, we are turning starboard and the dingy is on that side too. So we are not going anywhere, the boat is stuck between the mooring and the dingy. I am of course as expected, panicking. We are stuck! The rope is caught under the boat, it is going to be chewed by the motor, the million dollar boats are closer and closer, we are going to die!
Somehow, we get unstuck and start our sailing journey down the Huntington Harbor channel. Very slowly, thank goodness, we move down the channel, a couple of tacks here and there and soon John realizes there is not enough wind to keep going. He decides we should go back. [Smile.]
The journey back is relaxing, nice breeze blowing from aft (I got to use one of those words!) and we just sail gently back to the mooring, without the engine. Done for today.
I kept insisting that sailing is a sport for adrenaline junkies, and that I am not really cut out for it and that maybe we should try extreme gardening if we want adventure. John just smiled and said “I had planned for every eventuality on our departure, if it wasn’t for that darn dingy it would have been perfect”.
As a final thought on our conversation, John was telling me that mistakes make one a better sailor, and later in the day I read the following quote “A master is someone who has made a lot of mistakes.” I guess we are on our way to a masterpiece.
>>> Next Episode: Cabin Boy Refit
Hi John, here's a word picture to help Helena:
ReplyDeleteThe leech of a sail is where the air leaves the sail to leach back into the atmosphere.
Two more that might help:
ReplyDeleteThe tack is where the sail is tacked down to it's anchorage, and the clew is where you haven't a clue where it might end up next!
True, so true.
DeleteHi John
ReplyDeleteGood drawings!! I pity poor Helena with all those sheets and Halyards to pull, god bless her. But what a lovely boat to learn to sail on.
Michael
She's tougher than she sounds ;-)
DeleteI love sailing! Well, riding on a boat and let others sail it. I dont know much about sailing but I sure love going to sea! Nice blog! I enjoy reading it! thanks!
ReplyDelete