The goal is to build the William Atkin designed Vintage in time for the "I Built It Myself" show at the Wooden Boat Show in Mystic, CT.
Why Vintage? Several reasons.
First, I think it's time I tackled a round-bottom boat. Again, I think this is a project that is way above my current skill level, but I'm a real believer in the adage that people can do more than they think they can. Just because I doubt my ability to build such a complicated boat, is no reason to not do it.
Sounds weird, right? Ah well.
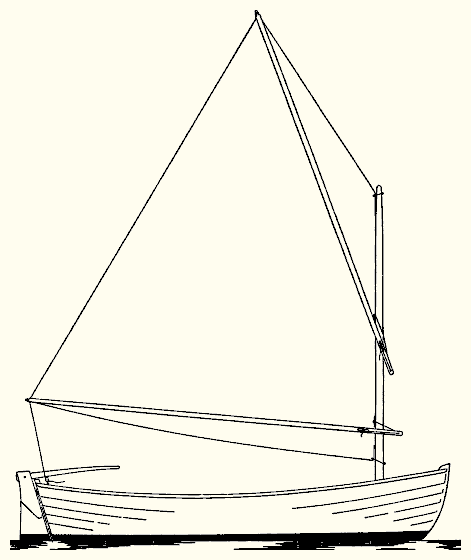 |
| William Atkin Vintage 10' round-bottom lapstrake |
Third, I really like the Atkin designs and Pat Atkin is a great help, and I happen to live in the town that William Atkin got his start in, back in 1906. So for me, it makes sense to stick with the Atkins.
Fourth, I'd like to see if I can find ways to make these very traditional designs more accessible to rank-amateur builders like me. It seems to me that a lot of people are building simpler boats because they think something as complicated as Vintage is too hard for them. If I can find ways to simplify the build, that might make it easier for others to build these beautiful boats.
Hey, if a duffer like me can build it, anyone can!
But the winter is slipping away fast! Helena convinced me to set up a simple project plan to keep me on track. Good thing she did, because it helped me get in a more 'business-like' frame of mind. This should help keep me focused. I tend to get distracted by interesting side issues like cutting my own lumber from county forest land. Interesting, but not compatible with my schedule!
I should be able to make the show deadline, but must get cracking, because there's a lot to do!
The first step was to set up a decent work space. It's the same basement space I used to build Cabin Boy, but then it was a bit of a cluttered mess. I decided to start fresh with a completely empty room, except for some shelves and benches.
 |
| Building space, after passing cat inspection photo jalmberg |
 |
| Other end, with 'Thinking Chair' ready to go photo jalmberg |
For Cabin Boy, I used 1/4" plywood. I found this to be too thin to hold the nails needed for bending battens for curves, so decided to go with 3/4" plywood. I found a couple good quality sheets at HD for $25 each. A steal.
Since I needed a 13' board, I needed to cut one of the sheets. This was a lot harder than I thought it would be. I thought I could use my jigsaw by clamping a kind of fence to the board, but that idea failed miserably! Each time I cut (and I tried several times) the line would veer off to the left. Why???
I thought maybe the clamped jig was moving, but obviously it wasn't.
Finally I figured out that the blade was bending to the left. Why always to the left, I don’t know, but it did.
 | |
| The wrong tool for the job photo jalmberg |
Well, no harm done.
The jigsaw was my only power saw, so it was time to break out the hand saws. I tried several different approaches, but what finally worked was cutting the sheet vertically with a Japanese pull saw. This made a clean, accurate, 90 degree cut with very little effort.
 |
| The all-purpose Japanese pull saw photo jalmberg |
So the pull saw saved me again, but my next job is to rip a couple 13' battens from 3/4" clear pine. It's clear I need a better tool for this job.
>>> Next Episode: Lofting Board
May I assume you have measured the door and know what size the boat will be, and thus, you know you can get the completed boat out of the basement? You do fine work (judging by what you have posted about Cabin Boy), and I would hate to see the Atkin stuck in the basement for all time.
ReplyDeleteLOL... yes, that was the first thing I thought about, but you made me run down to double-check.
ReplyDeleteThese boats aren't too high, so they fit through normal doors sideways, and I have enough room lengthwise to maneuver it out of my basement.
Good to read your first post about building Vintage. Sorry that you have a deadline to meet. Hard deadlines take all the fun out of a project for me.
ReplyDeleteI have just started building the Nutshell Pram from plans. A 'soft deadline' is when we start sailing in the summer. It will be a dingy for our small sailboat. I do travel away from home to work full time so boat building is limited to a day or two each month. No doubt you will finish Vintage before I complete the pram, but we both will have fun.
Looking forward to your posts.
As Helena would be happy to tell you, without deadlines, I get nothing done.
ReplyDeleteBest way to set a deadline? Tell a couple thousand people about it!
Enjoy the Nutshell build. Do you have the step-by-step guide from WB? Is it helpful?
Great to watch - sadly this increases the pressure I feel to get working on my on own project - lofting seems the next step .... good man you are!
ReplyDeleteJohn, suggest using a skilsaw to cut gentle curves. Put a 4x8 sheet of two-inch thick closed cell foam on the floor, put the plywood on it, and cut away. If you don't want to use a skilsaw or want tighter curves, use a little battery-powered circular saw (5 inch diameter blade). s/Pete
ReplyDeleteTo answer your question about the Nutshell build:
ReplyDeleteYes, I bought the plans and the book from WB. I have also found a lot of pram builders articles and pics on the net that are very helpful with lots of interesting hints.
cheap or used jigsaw blades will cut an unwanted & varying bevel due to the teeth on one side being sharper then on the other - this pushes the blade sidways away from the blunt side. If you do need to use a jig saw for this sort of job use a brand new blade of a good brand & dont hurry the cut.
ReplyDeleteHi John
ReplyDeleteNice blog and good luck with the project. I'll put a link on www.scottishboating.blogspot.com and you may want to reciprocate.
Best wishes
You guys are way ahead of me. After reading my boat building books for a solution to my saw problem, I decided to buy a Skilsaw.
ReplyDeleteMore experienced boat builders have been telling me I needed a Skilsaw for a year or so, but I just didn't 'get' it.
I followed Tom Hill's recommendation in his book "Ultralight Boatbuilding" and got the Skilsaw Model 77. Wow. Should have got one long ago. More details in the blog.
I was using a new Dewalt jigsaw blade in that pic. The problem was, I think, that I was using a fence. Probably if I had just followed the cut line free hand, the blade would not have bent like that.
ReplyDeleteBut still, I think it's the wrong tool for cutting 3/4" plywood. My new Skilsaw would have done a much better job.
I'm a signpainter and the only jigsaw to use for me is a Bosch, in fact I own two of them. They make great blades and great cuts. Not cheap but great to use!!! Warren Percell
ReplyDeleteHave you seen the Website of Eric Hvalsoe? he built a Vintage and the owner posted 50 or so build photos on Flicker,righ tthru launch and sailing . Link is on Hvalsoes's site. He is a master craftsman, and you will really like his result
ReplyDeleteregards Eric ( right here on LI as you recall )
Own bigger plastic thingy ( Frers 33 )
Eric: yes, I have. Great work.
ReplyDelete