The
Blue Moon has a lot of lines. To take just the lines that come down the main mast, you have the:
- jib halyard
- foresail halyard
- mainsail peak halyard
- mainsail throat halyard
- mainsail topping lift
- the topsail halyard
- the topsail downhaul
- the topsail outhaul
Then you've got the lines that lead into the cockpit:
- single mainsail sheet
- two jib sheets
- single foresail sheet
- two backstays
- mizzen halyard
- mizzen sheet
Not to mention the lines that terminate on the main or mizzen booms, or on the bowsprit:
- bobstay line
- bobstay tricing line
- mainsail outhaul
- mainsail reefing line
- mizzen lazy jacks
I'm probably forgetting a couple lines, but you get the idea. Put that many lines on a 23' boat, and things can get disorganized fast. Not helping matters: there aren't enough cleats on the
Blue Moon for all these lines. In fact, when I bought the boat, there were only 5 plastic cleats and 5 belaying pins. That meant that many of those tie-off points had 2 or even 3 lines wrapped around them. Need to get that backstay off quickly? Too bad! First you need to un-cleat the jib and foresail sheets. Have fun with that one!
As part of my 'no-drama' sailing program (more on that, soon), my goal is for each of these lines to have it's own dedicated cleat or belaying pin. I might even label them (... no, probably not!)
The point is, when you need to peak up the mainsail, it's a heck of a lot easier if (1) you know where it's belayed, and (2) the topping lift isn't tied on top of it.
Furthermore, you can imagine how difficult it is for a solo sailor to manage all these lines. A typical tack involves:
- putting the helm over
- half-way through the tack, when the sails are slack:
- tighten the (new) windward backstay
- release the (new) leeward backstay
- release the jib sheet
- heave in the opposite jib sheet
- breath again
To make tacking easier, all the lines that need to be handled during a tack should really be on quick-release jam cleats, rather than tied to a traditional horn cleat. The main sheet, for safety's sake, should also be on a jam cleat.
I've already built one cleat -- a boom cleat for the mainsail outhaul -- so I have a bit of experience with this... not a lot, but enough to get me going.
For my first jam cleat, I chose a pattern for what I believe is a Butler Cleat... a jam cleat designed by the famous 19th century canoeist, Paul Butler. I'm still trying to track down a definitive source for this pattern, but here's the pattern that I have:
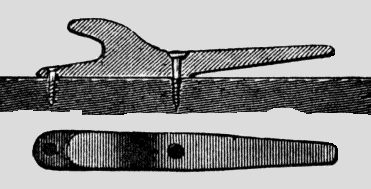 |
| 'Butler' Cleat |
I just Photoshopped this image into the size cleat I wanted, printed it out, and cut the side profile out with scissors. Just like in kindergarten.
Then I just layer it on a piece of scrap oak and traced around it with a pencil. This is no-drama building, so I didn't go crazy with this.
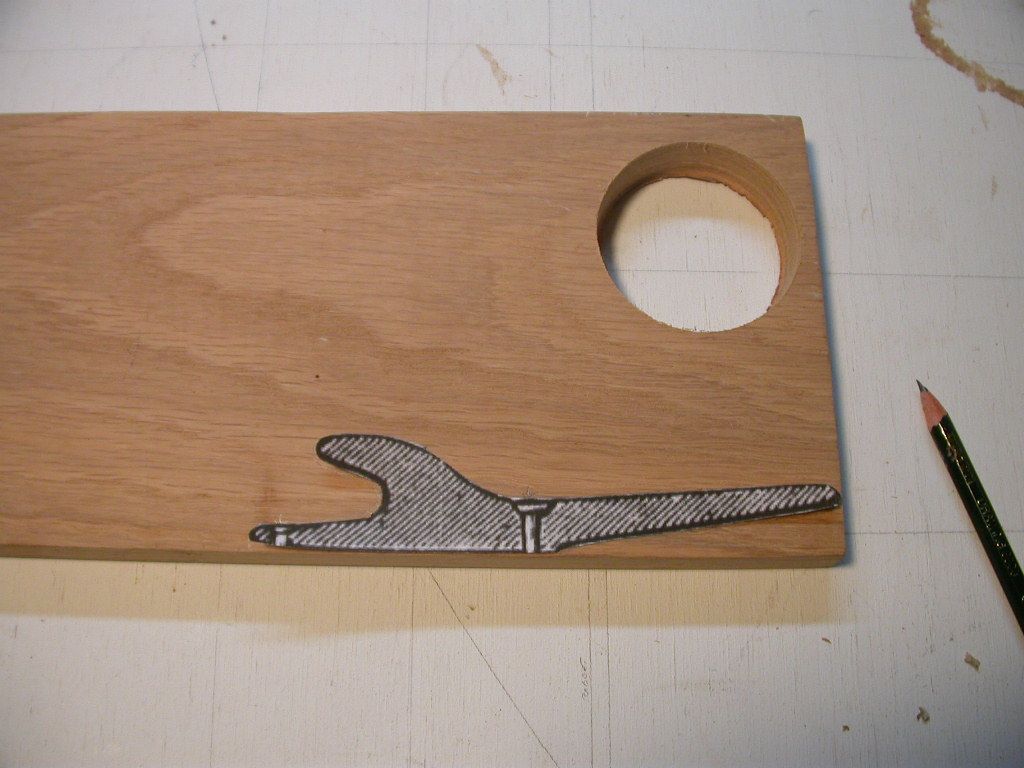 |
| 'Template' on scrap of Oak |
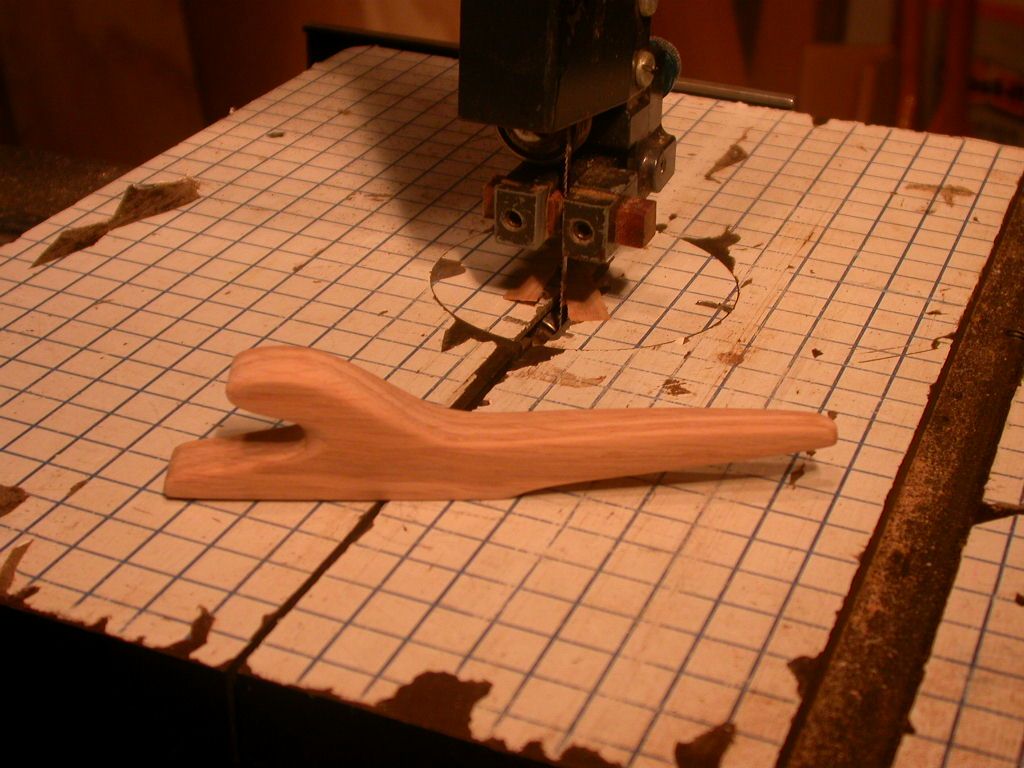
Then I roughly cut out the piece with a 1/8" blade on my 'new' 2-wheel bandsaw. I scored this beauty on Craigslist last week, from an octogenarian who's "downsizing" his woodworking shop. With it's solid construction, decent rollers, and powerful belt-drive motor, it's a huge step up from my old Buffalo 3-wheeler, and the price was unbeatable. Just goes to show that you can get some amazing tools for next to nothing if you are patient enough.
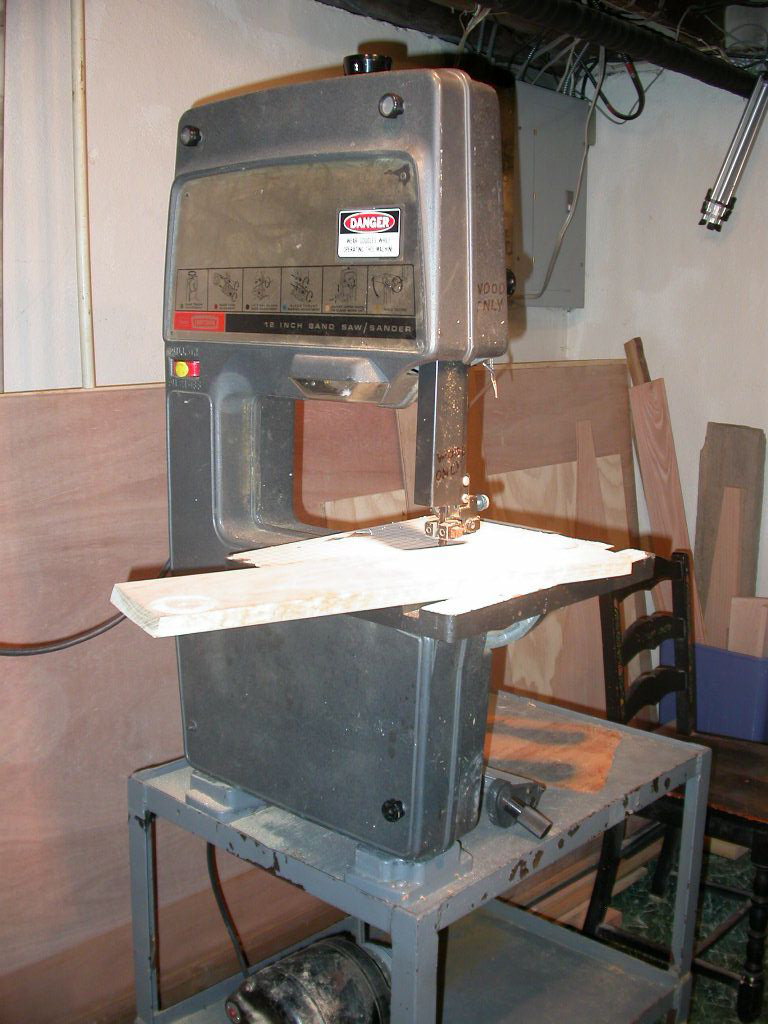 |
| New Bandsaw! |
The saw came with a box full of brand new blades (some with "Merry Christmas, grandpa!" labels still attached), so I installed a 1/8" blade, and used it to roughly cut out the cleat. Total time, maybe 5 minutes.
 |
| Roughly cut out |
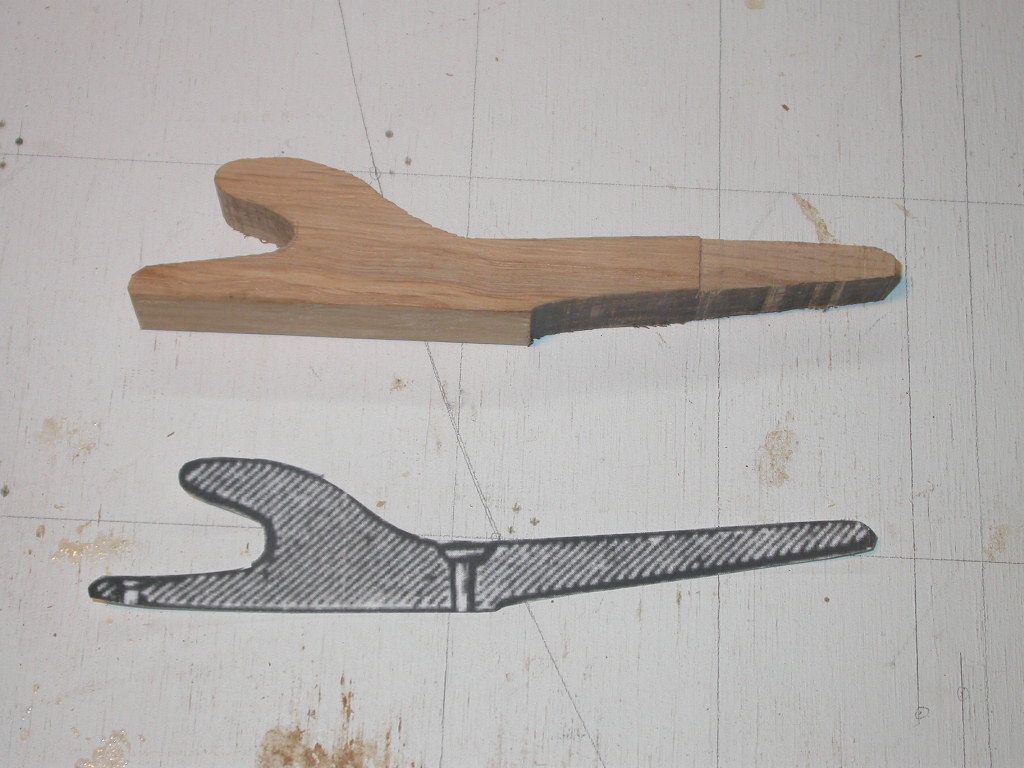
Then I quickly shaped it with some 60 grit sandpaper, used my cheese-grater style rasp to round the curve around the tall horn, and finished it off with 120 grit sandpaper.
Again, maybe 10 minutes.
 |
| After a bit of sanding |
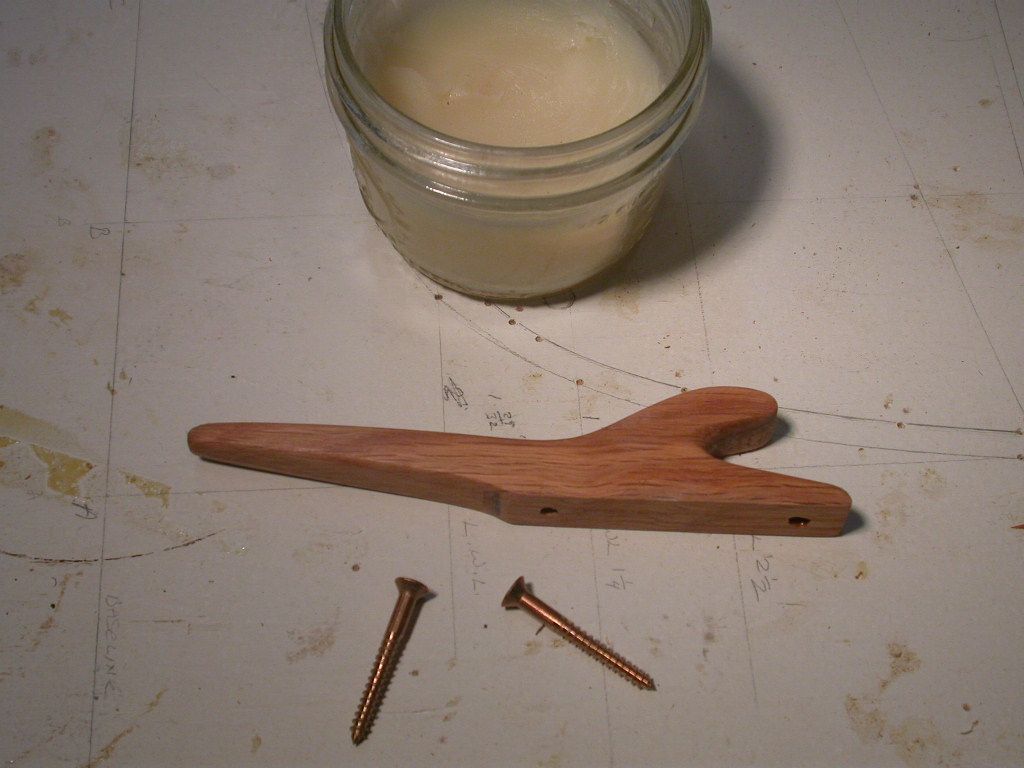
The only trouble I had was drilling the lower screw hole... the one on the left on the template. My countersink bit is a bit too large in diameter, so to get past the 'horn', I had to drill the hole a bit close to the back end of the cleat. Next time, I'll just cut the 'base' a bit longer, to allow more room for the screw. 1/4" should do it.
Since this was literally the first jam cleat I'd every actually seen, I really wasn't exactly sure how it would work. I wasn't even sure which direction it should point, or wether the rope should pass through the jamming side first, or after going around the 'horn' side first.
I had my theories, but I wanted to test them out before installing the cleat. So I screwed it down to a piece of scrap wood and played around with it for a bit.
Pretty obviously, the line should pass around the horn, first, then through the 'jammer'. I also discovered it worked great with lines from 5/16" or 3/8" line. For my 1/2" main sheet, I'd probably want to scale it up a bit.
 |
| Testing in shop |
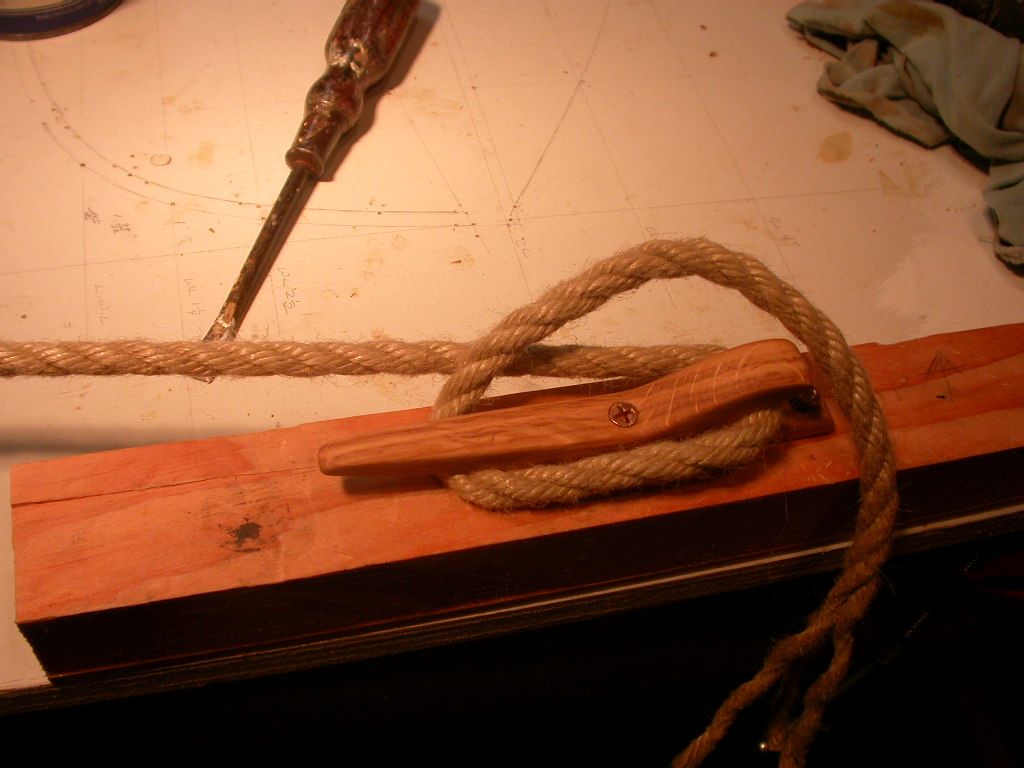
With the testing done, it was time to install it on the
Blue Moon, but first, I wanted to give it a bit of protection. The cleat is 'finished' with a coat of linseed oil, followed by a good rubbing of my home-brew paste wax, made from linseed oil and beeswax. I'm hoping this wax will lend more protection than linseed oil alone. Linseed oil is great for a table in your living room, but useless on a boat. It just doesn't last long enough. Only time will tell if wax is any better. I'll let you know.
 |
| Paste-wax and bronze screws |
Here it is, bedded down with Dolphinite, and screwed in with 1 1/2" bronze screws. I'm using this one for my foresail sheet. The pull of the line is all to the left, and screws are very strong against that sort of sheer force, so I think they will be strong enough. If there was any 'lifting' force, I'd want to through-bolt them.
 |
| Installed and working! |
Anyway, my son Chris and I took the cleat out for a shake-down cruise this weekend, and it performed magnificently. I'm going to build several more of various sizes for the rest of my quick-release lines.
It was a real joy to complete a project in one easy evening. The old timers designed cleats in all sorts of different specialized shapes, but none of them look hard to make. If you're looking for a quick and cheap way to improve your boat, building strong, good looking wood cleats is a great option.
And if you use scrap wood, they're practically free! What more could you ask for?
If this inspires you to build any, please send photos and I'll post them to a future blog.
>>> Next Episode:
Helena Gets a Notion
John - you should have found an Atkin boat!
ReplyDeleteNot so easy to do!
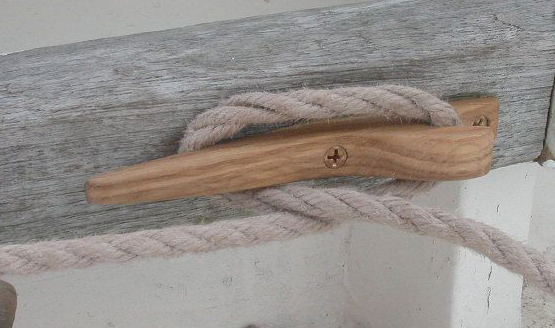
DeleteIt's very important to install the cleat at an angle to the lead of the line, not in-line with it.
ReplyDeleteWhen planning cleats and pins on your scale the old (and new!) square riggers had a very clear pattern.
The higher the sail, the further forward the pin. If the pin-rail is athwartship, the higher sails lead to the outer pins.
Then it's easy for anyone to 'learn the ropes'.
Yes, my photo isn't a very good illustration of the actual lead direction. Actually, the lead comes from slightly above the cleat, so it comes in at an angle. Unfortunately, it blocked the view of the cleat, so I moved it down to take the picture.
DeleteI laid out my pin rails with some easy-to-remember logic... On starboard side, the forward pin is for the jib halyard, the middle one for the foresail halyard, the aft one is unused at the moment.
On the port side, the forward pin is for the throat halyard, the middle for the peak. I might put the topping lift on the aft pin, but for now that is tied off on a pin on the mast.
I use a recommendation from the late Wm. Gardner. He recommeds submerging the wood in boiled linseed oil for a month. Then drying it out for a couple of weeks and then the finish. He used varnish but your finish should work fine I suspect. We just did this for a set of deadeyes and wood cleats for a boat we built for a client and so far they are great.
ReplyDeleteI've tried several variations of the linseed oil thing and haven't had much luck with it. Varnishing over it would work, until the varnish rubbed off... It's a problem!
DeleteHi John,
ReplyDeleteWhy do you use your backstays in a typical tack? As my typical tacks are from windward to windward, the f'wd stays are tensioned and the backstays are not. For 'no-drama' sailing, I would suggest to only use backstays on downwind courses.
Bye, Erwin.
I still have lots to learn about gaffers... I'm the only one in my harbor who has one, so there's no one to ask. Everything I know about gaffers comes from reading old books.
DeleteSo you are saying that backstays aren't needed when sailing up wind. That certainly would simplify matters. I must look into that. Thanks!
When looking at the grain of your oak stock, wouldn't it have been better to reverse the direction of the template when you were laying it out? That would align the grain with the long horn of the cleat. I am no expert, so could easily be wrong on that one.
ReplyDeleteH'mmmm... That's why I call this a 'How not to' blog... I do think you are right, now that you mention it. I'll be sure to think about that the next time. Thanks!
DeleteI made a couple of cleats similar to yours out of teak. They both failed after many years of use, one failure nearly caused the loss of the boat (and possibly myself). I've now changed to galvanised steel for security, but that doesn't look half as nice and is not as sweet to use.
ReplyDeleteOak should be better, with it's tighter cross linked grain, but they should be inspected each season for cracks or deterioration, and having an alternative anchorage for if one should fail is a good thing. That's where I went wrong, and I had to sail holding the halyard to keep the sail up!
Good advice. There isn't much weight on this cleat (unless I step on it by accident), and it's all on the blunt, horn side, so it's hard to imagine how it could fail except by drying out and cracking. But I'll definitely keep an eye on it. If it did fail, nothing much would happen, except the foresail would luff. I could go back to tying off the sheet on the heavy teak bit that the cleat is now screwed to.
DeleteI'm not sure that Erwin meant "don't use your backstays' when tacking upwind. I wonder if he meant that you don't need to slack off the leeward backstay if the new tack is still hard on the wind. IMO you must keep the windward stay tight. Personally, I would always ease the leeward stay; but hard on the wind I might not seize it to the leeward shrouds.
ReplyDeletePaul Butler, inventor of the sailing canoe sliding seat, invented these for cleaning his sheets and had them cast in aluminum. Far as I know it was the first “engineered” jam cleat for racing sailors. You might have gotten this from my Cheap Pages. I got it from a contemporary ca 1880s source, probably Forest and Stream.
ReplyDelete